# ExaVault Documentation

ExaVault is an on-premise appliance for file transfer and file sharing, including full support for FTP, SFTP, and WebDAV.

ExaVault is actively supported, and we look forward to making some exciting announcements in 2025. We are a division of Files.com, the leading cloud managed file transfer vendor.

Previously, ExaVault was also referred to as SmartFile, FileHub, VeriStack, and Lumanox. These previous names are no longer in use, but you may see them referenced in source code or older documentation produced by ExaVault.


# Installing & Upgrading The Appliance


# Downloading The Base Image

The ExaVault appliance is available on AWS Marketplace, Google Cloud Marketplace, and as a VMWare .ova image. Microsoft Azure is supported by converting the VMWare image.

## Amazon Web Services (AWS)

ExaVault is published on the AWS Marketplace, which launches an ExaVault server directly into your AWS account.

[ExaVault on the AWS Marketplace](https://aws.amazon.com/marketplace/pp/prodview-ak3rh6b5e5jue)

The minimum supported instance sizes on AWS are `c5n.xlarge`, `m6i.xlarge`, or `m7i.xlarge`.

## Google Cloud Platform

ExaVault is published on the Google Cloud Marketplace, which launches an ExaVault server directly into your Google Cloud Platform account.

[ExaVault on the Google Cloud Marketplace](https://console.cloud.google.com/marketplace/product/exavault-public/exavault?inv=1\&invt=AbwwYA\&project=exavault-public)

The recommended instance size is `n2-standard-4`.

## VMWare

ExaVault is distributed as a .ova file for VMWare.

[ExaVault .ova Image for VMWare](https://www.files.com/api/download/exavault?platform=vmware)

## Microsoft Azure

ExaVault runs on Microsoft Azure by converting the VMWare image with tools published by Microsoft.


# System Requirements

ExaVault is delivered as a virtual appliance. You are responsible for provisioning a physical environment and hypervisor in which to run the ExaVault appliance.

ExaVault requires a 64-bit Intel processor. ARM environments, including AWS Graviton instances, are not supported.

The ExaVault Virtual Appliance is tested and supported in the following virtual environments:

* VMware ESXi 5.x, 6.x, 7.x, 8.x
* Microsoft HyperV
* Amazon AWS
* Microsoft Azure
* Linux KVM

Within the hypervisor or cloud system of your choice, you will need to provision the following minimum resources:

* **CPU:** 4 cores at 2.4 GHz or greater
* **Memory:** 12 GB of memory (RAM)
* **Primary Disk Drive:** 100 GB
* **Data Disk Drive:** Sized at your discretion. All data on the appliance is saved to this drive, so make it as large as your environment can support. We recommend starting with at least 500 GB.

The minimum supported instance sizes on AWS are `c5n.xlarge`, `m6i.xlarge`, or `m7i.xlarge`.

You will also need a static (or rarely-changing) IP address because your installation's [license is associated with its IP address](/administration-tasks/license-keys#ip-address-changes). Frequent updates to the appliance's IP address will invalidate the license.

Workloads vary widely across our customer base, so sizing guidance beyond these minima is hard to give in the abstract. Monitor RAM and CPU usage and upscale the instance when either resource is constrained.


# Firewall Configuration

We strongly recommend deploying the ExaVault virtual appliance behind a firewall. The tables below list the ports to open.

The appliance also requires some inbound and outbound connectivity to the public Internet, detailed below.

## Inbound Traffic (Public Internet) Port Requirements

| **Port**    | **Description**                                                                                                                                                                                                                                                                                                               |
| ----------- | ----------------------------------------------------------------------------------------------------------------------------------------------------------------------------------------------------------------------------------------------------------------------------------------------------------------------------- |
| ICMPv4      | Used for verifying the server is up and accessible.                                                                                                                                                                                                                                                                           |
| 80          | Used for non secure web GUI access to the application. Does not need to be made available publicly.                                                                                                                                                                                                                           |
| 443         | Used for secure Web GUI access to the application. Does not need to be made available publicly. Also used by the API.                                                                                                                                                                                                         |
| 21          | Used for FTP access to the appliance. Does not need to be open if the FTP service is not used externally.                                                                                                                                                                                                                     |
| 22          | User for SFTP access to the appliance. Does not need to be open if the SFTP service is not used externally.                                                                                                                                                                                                                   |
| 990         | Used for FTPS access to the appliance. Does not need to be open if the FTPS service is not used Externally.                                                                                                                                                                                                                   |
| 40000-49999 | <p>Used for FTP/FTPS data channels to the appliance. Does not need to be open if neither the FTP nor FTPS services are used Externally.<br><br>Note: Currently only a subset of this range is used by the appliance, but we recommend opening the entire range because we will be expanding the range in future versions.</p> |

## Inbound Traffic (Internal Network) Port Requirements

| **Port**    | **Description**                                                                                                       | **Required** |
| ----------- | --------------------------------------------------------------------------------------------------------------------- | ------------ |
| ICMPv4      | Used for verifying the server is up and accessible.                                                                   | YES          |
| 80          | Redirects to HTTPS port 443                                                                                           | YES          |
| 443         | Used for secure Web GUI access to the application. Does not need to be made available publicly. Also used by the API. | YES          |
| 21          | Used for FTP access to the appliance. Does not need to be open if the FTP service is not used externally.             | NO           |
| 22          | User for SFTP access to the appliance. Does not need to be open if the SFTP service is not used externally.           | NO           |
| 990         | Used for FTPS access to the appliance. Does not need to be open if the FTPS service is not used Externally.           | NO           |
| 10022       | Used for support sessions to the appliance. ( for support sessions SSH access is required running on port 10022 )     | YES\*        |
| 9002        | Used to access the appliance manager web GUI ( for setup and management of the appliance )                            | YES\*        |
| 40000-49999 | FTP Passive Ports                                                                                                     | NO           |

\* These ports are needed for administering the system and must be locked down at the firewall.

## Outbound Traffic Port Requirements

| Port | Description                               | Required |
| ---- | ----------------------------------------- | -------- |
| 80   | Used to download updates from our servers | YES      |
| 443  | Used to download updates from our servers | YES      |
| 53   | DNS services to resolve names for updates | YES      |
| 389  | Used for LDAP connections                 | NO       |
| 636  | Used for LDAPS connections                | NO       |


# Installation & Setup

## Prerequisites

Before installing the ExaVault appliance, confirm that you can provision a virtual appliance that meets our [System Requirements](/installing-and-upgrading-the-appliance/system-requirements) and that you can comply with our required [Firewall Configuration](/installing-and-upgrading-the-appliance/firewall-configuration).

If you plan to use SSH to connect to your appliance, update your networking rules to allow inbound TCP 10022 from the addresses that will manage the appliance before starting.

### Networking

You will need a static (or rarely-changing) IP address because your installation's [license is associated with its IP address](/administration-tasks/license-keys#ip-address-changes). We recommend assigning an Elastic IP address, which prevents IP changes due to instance resizes, stops, and restarts. Frequent updates to the appliance's IP address will invalidate your license.

You will need to know the internal IP Address the appliance will be using as well as the public IP Address to be used for Network Address Translation (NAT).

### Domain Name

ExaVault requires that the server has a Fully Qualified Domain Name (FQDN) set as the server's hostname.

We recommend not using the word `ftp` in this domain. We suggest using `files.yourdomain.com` (for example, `files.example.com`).

### SSL Certificate

Obtain an SSL certificate for your domain name from a trusted vendor. It will be used to secure HTTPS and FTPS connections. Your appliance will not run successfully without an SSL certificate.

## Download & Import The ExaVault Image

If you are using VMWare, [download the ExaVault image](/installing-and-upgrading-the-appliance/downloading-the-base-image) and use your hypervisor system to import the ExaVault image and launch the VM. Add the secondary drive for data storage and attach it to the VM as part of this step.

If you are using VMWare, the image ships with a default username and password. Power on the virtual machine and log in via the VMWare console as `admin` with the password `DefaultPassChangeMe1!`.

### Amazon Web Services (AWS)

Refer to the [AWS Installation](/installing-and-upgrading-the-appliance/installation-and-setup/aws-installation) instructions.

### VMWare

ExaVault is distributed as a .ova file for VMWare.

[Download the ExaVault .ova image for VMWare.](https://www.files.com/api/download/exavault?platform=vmware)

After obtaining the ExaVault .ova image, follow the steps to configure the [VMWare Prerequisites](/installing-and-upgrading-the-appliance/installation-and-setup/vmware-prerequisites), then continue to Bootstrap the Appliance.

## Bootstrap The Appliance

If you are installing the appliance from the AWS Marketplace, bootstrapping is unnecessary. Refer to the [AWS Installation](/installing-and-upgrading-the-appliance/installation-and-setup/aws-installation) instructions.

Connect to the appliance using your VM console or via SSH. The VM uses a nonstandard port for SSH, so you must specify port 10022 for an SSH connection.

By default, ExaVault's cloud marketplace listings do not open inbound traffic to port 10022 from the Internet. If you plan to use SSH to connect to your appliance, update your networking rules in your cloud provider to allow inbound TCP 10022 from the addresses that will manage the appliance before starting.

Run the bootstrap command to mount your data drive and launch the Appliance Manager.

<pre><code><strong>sudo exavaultctl -o bootstrap --device &#x3C;device>
</strong></code></pre>

The `--device` option can be omitted if using the default `/dev/nvme1n1`. Otherwise replace `<device>` with the device of your data disk drive.

## Configure the ExaVault Appliance <a href="#login_to_the_file_hub_appliance_manager" id="login_to_the_file_hub_appliance_manager"></a>

After you've bootstrapped the appliance, the `exavault-admin-dashboard` container will be running. Use a web browser to visit the IP address for your appliance on port 9002 - https\://\<your-appliance-ip-or-hostname>:9002/. A security warning will appear because the SSL certificate is not yet configured.

When you connect for the first time, you'll set a password for the Appliance Manager. Save this password in a secure location.

You need to do some configuration before you can run the appliance: add the license information, update the server configuration, and install the SSL certificate. All of the steps must be completed before the appliance will start successfully.

### License Information

Complete the form to automatically generate your free license for ExaVault. No payment information is required, and your contact information is stored securely.

### Configuration

On the Configuration page, you'll enter information about your network environment.

* **Hostname:** The hostname (URL) the application will use. It must be set to the Fully Qualified Domain Name URL that you will use to access the service.
* **IP Address:** The IP address matching the DNS record used in the Hostname field of the appliance. It is used for FTP/SFTP to handle NAT properly.
* **External FTP IP Address:** Typically the same as IP Address. It can be different if the appliance has an internal IP and ports are being forwarded from an external IP address via a router.
* **Email Host**: The address of the server that will deliver email messages generated by your ExaVault appliance.
* **Email Port**: The port used for connecting to your mail service for sending.
* **Email SSL:** If your mail sender requires the use of SSL, check this box. This is typically the case when using port 465 for your email port.
* **Email Username & Email Password:** The credentials used to authenticate with your mail service for sending.
* **Email From:** The from email address that will be used for emails generated by the ExaVault appliance.

### SSL Certificate

Open the SSL Certificate page of the Appliance Manager and upload your SSL Certificate.

#### Upload Certificate

If you have already obtained your SSL certificate, upload it on the *Upload Certificate* tab. You will supply a single file which contains the certificate, its intermediate certificates, and its private key, in that order.

#### Generate Certificate (Self Signed)

The form on this tab will generate a self-signed cert. This is the least preferred option.

#### Generate CSR

This tab generates a brand new Certificate Signing Request (CSR) that you can submit to your SSL Certificate Provider.

Once your SSL Certificate Provider has provided you with your renewed SSL Certificate, use the *Upload Certificate tab* to import the certificate, its intermediate certificates, and its private key.

#### Trusted CA

The appliance can trust a CA Certificate under the *Trusted CA* tab. Organizations with their own Certificate Authority add their CA.crt to this section.

Do not change the settings under the System tab unless ExaVault Support has directed you to update them.

### Verify SSL Certificate

Once you have configured your certificate, open the appliance manager using your fully qualified domain name and verify that your certificate is being used for the connection.

For example, if your domain is files.example.com, open <https://files.example.com:9002>.

When the web page loads, no browser security warning will appear if everything has been configured correctly.

## Start the Appliance

Complete all of the steps to Configure the ExaVault Appliance, including verifying that SSL is properly configured before moving on to the next step.

Using your VM console or SSH, run the command to start the appliance:

```
sudo exavaultctl -o start
```

It may take several minutes for all of the containers to start. When the command has completed, you can access the web interface for your ExaVault installation.

## Log In To the Web Interface

Use a web browser to access your server at the address you configured for the appliance's hostname. Log in with the default username `administrator` and the password `password`. Change your password immediately upon logging in.


# AWS Installation

Installing the appliance on AWS takes a few steps:

* Gather the prerequisites (a fully-qualified domain name and a static IP address).
* Launch a new EC2 instance using the AMI.
* Configure the settings in the appliance manager.

## Prerequisites

Before installing the ExaVault appliance, confirm that you can provision a virtual appliance that meets our [System Requirements](/installing-and-upgrading-the-appliance/system-requirements) and that you can comply with our required [Firewall Configuration](/installing-and-upgrading-the-appliance/firewall-configuration).

If you plan to use SSH to connect to your appliance, update your networking rules to allow inbound TCP 10022 from the addresses that will manage the appliance before starting.

### Networking

Set a static (or rarely-changing) IP address because your installation's [license is associated with its IP address](/administration-tasks/license-keys#ip-address-changes). Frequent updates to the appliance's IP address will invalidate the license.

You will need to know the internal IP address the appliance will use, along with the public IP address used for Network Address Translation (NAT).

### Domain Name

ExaVault requires the server to have a Fully Qualified Domain Name (FQDN) set as its hostname.

We recommend not using the word `ftp` in this domain. A pattern like `files.yourdomain.com` works well.

### SSL Certificate (optional)

Obtain an SSL certificate for your domain name from a trusted vendor. It secures HTTPS and FTPS connections. Your appliance automatically creates a self-signed certificate during installation. We strongly recommend providing your own SSL certificate to avoid security warnings.

## Launch the Instance

ExaVault is published on the AWS Marketplace, and you can use the AWS Marketplace to launch an ExaVault server into your AWS account.

[ExaVault on the AWS Marketplace](https://aws.amazon.com/marketplace/pp/prodview-ak3rh6b5e5jue)

The minimum supported instance sizes on AWS are `c5n.xlarge`, `m6i.xlarge`, or `m7i.xlarge`.

A security group with the recommended network rules is included in the software.

Launch the instance and wait a few minutes for the system to initialize. Use a web browser to connect to your instance's public IP address, either through `http://<public IP>` or `https://<public IP>`.

When the appliance has initialized, it creates a self-signed SSL certificate, which may display a security warning in your browser. It is safe to instruct your browser to let you interact with the site so you can move on to configuration.

## Configure the Appliance

### Appliance Manager Password

Your first step in configuring the appliance is to enter a new password for the appliance manager.

### Registration

After you have assigned a password, complete the form to register your appliance and create a free license. No payment information is required, and your contact information is stored securely.

### SSL Certificate (optional)

Your appliance creates its own self-signed SSL certificate during installation. Self-signed certificates are not trusted by clients, and usually cause security warnings. Your appliance can operate successfully using the self-signed certificate, but we recommend providing your own SSL certificate.

If you choose not to add your own SSL certificate during installation, you can visit the appliance manager after setup is complete to [add the SSL certificate](/administration-tasks/installing-or-updating-ssl-certificate).

### Configuration

Once you have created your license, you will see the home page of the appliance manager. On the Configuration page, enter information about your network environment.

* Hostname: the hostname (URL) the application will use. It must be set to the Fully Qualified Domain Name URL you will use to access the service.
* IP Address: the IP address matching the DNS record used in the Hostname field of the appliance. Used for FTP/SFTP so that NAT is handled properly.
* External FTP IP Address: typically the same as IP Address. It can differ when the appliance has an internal IP and ports are forwarded from an external IP address via a router.
* Email Host: the address of the server that will deliver email messages generated by your ExaVault appliance.
* Email Port: the port used for connecting to your mail service for sending.
* Email SSL: check this box if your mail sender requires SSL. This is typically the case when using port 465 for your email port.
* Email Username and Email Password: the credentials used to authenticate with your mail service for sending.
* Email From: the from address used for emails generated by the ExaVault appliance.

## Ready to Use

When you save the configuration changes, your appliance will restart. When the restart finishes, your appliance is ready, and you can start [Using ExaVault](/using-exavault) now.

## Log In To the Web Interface

Use a web browser to access your server at the address you configured for the appliance's hostname. Log in with the default username `administrator` and the password `password`. Change your password immediately upon logging in.

`https://<your domain>/` is the address of your web application.

## Other Connections

Your [FTP & FTPS](/connection-methods/ftp-and-ftps) and [SFTP](/connection-methods/sftp#connection-settings) services are ready to connect using either the public IP address or domain name.

`https://<your domain>:9002` will grant access to the appliance manager.


# VMWare Prerequisites

If you are using VMWare, [download the ExaVault image](/installing-and-upgrading-the-appliance/downloading-the-base-image) and use your hypervisor system to import the ExaVault image and launch the VM.

Add a secondary drive for data storage and attach it to the VM. Make it as large as your environment can support. All data on the appliance is saved to this drive. The minimum size is 500GB.

Once the new VM is created, open **Edit Settings** for it.

Change the CPU and Memory settings to match the required resources. Normally this is [4 vCPU and 16 GB of memory](/installing-and-upgrading-the-appliance/system-requirements).

The **Guest OS Family** must be set to Linux, and the **Guest OS Version** to Debian GNU/Linux 6 (64bit).

The root disk for the new VM must have at least 100GB of available space.

Power on the virtual machine and login via the console as `admin` with the password `DefaultPassChangeMe1!`.

Change the hostname to your desired hostname using the command:

```
hostnamectl set-hostname <existing_hostname>
```

Use the `passwd` command to change the password for the admin user.

Create and apply the appropriate netplan configuration in `/etc/netplan/`.

#### Netplan Example Configuration

Use the example template below to create a network configuration for your environment.

```
network:
  version: 2
  ethernets:
    ens192:
      dhcp4: no
      addresses:
      - 192.168.0.5/24
      nameservers:
        addresses: [8.8.8.8, 4.2.2.2]
      routes:
      - to: 0.0.0.0/0
        via: 192.168.0.1
      routing-policy:
      - from: 192.168.0.1/24
```

After the network configuration has been set, apply the changes:

```
netplan apply
```


# Installing Other Software

The ExaVault appliance is provided as a virtual machine image for VMWare or cloud marketplaces such as AWS, Google Cloud or Microsoft Azure, and requires minimal ongoing server maintenance.

When you install the ExaVault appliance, you have full administrator access to the virtual machine as the "root" user. This grants you access to make any changes to the virtual machine through the server console or SSH.

We don't encourage installing custom software on the ExaVault appliance, though we know some organizations require specific software to be included when adding the appliance to their infrastructure.

If you must install software beyond what is included on the virtual machine, two drawbacks apply.

## Service Dependencies and Environment Stability

The appliance contains a number of services that rely upon a specific system configuration to function predictably. Installing other software can have unforeseen interactions with the ExaVault services. For example, if your custom software interferes with the [required firewall configuration](/installing-and-upgrading-the-appliance/firewall-configuration), file transfers can be disrupted.

## Version-Dependent Update Process

The approach to updates depends on which version of the appliance you are running. If you are running a version prior to 18.1, updating ExaVault versions requires installing a new virtual machine. As a result, you'll have to re-install all your custom software each time you update ExaVault from a version lower than 18.1.

If you're already on version 18.1 or higher, ExaVault updates can be applied automatically without replacing the entire virtual machine, which means your custom software won't need to be re-installed repeatedly.


# Mounting the Data Drive

Mount your data drive on the appliance with the `exavaultmount` tool, run from a console or SSH session. Use this command with great care — mounting the data drive incorrectly can delete your data.

To mount a drive:

```
sudo exavaultmount --operation mount --destination /data --source /dev/sdb --type xfs
```

If your drive resides at a different location than `/dev/sdb`, substitute that path.

More `exavaultmount` documentation is found by running:

```
sudo exavaultmount --help
```


# Automatic Updates

Automatic Updating is available exclusively on premium plans. It keeps your appliance current with the latest security patches and software improvements, covering both the ExaVault software and the underlying Linux operating system.

On non-Premium plans, updates require downloading a new image from ExaVault and manually re-mapping the data disk to the new instance.

## Enabling Automatic Updates

Log into the Appliance Manager to enable or disable automatic updates. The Configuration Page includes the settings:

* **Auto-Update** - When the box is checked, ExaVault will automatically check for new updates once per day, and will automatically apply new updates.
* **Time of Day & Timezone** - This is the hour of the day and the timezone used for ExaVault to check for updates. If *Auto-Update* is enabled, ExaVault will check every day during that hour. This lets you plan for updates and avoid disruptions.

The automatic update schedule also extends to OS-level maintenance through unattended upgrades, so your entire stack stays aligned and secure without manual intervention.

## Disabling Automatic Updates

You can turn off the Automatic Updates feature in the Configuration Page of the Appliance Manager. Uncheck the **Auto-Update** checkbox to disable automatic updates.

## 1-Click Updates

If an update is available and you have not enabled Auto-Updates, use the **Update Now** button on the Home Page of the Appliance Manager to start the update immediately.


# Using ExaVault


# Users

Administrators manage file and folder access for both individual users and groups to control what each user can see and do within a site.

For directory-backed authentication and provisioning, see [Active Directory And LDAP](/using-exavault/users/active-directory-and-ldap).

## User Home Directories

Each user is assigned a Home Directory, which acts as their virtual root on the system. Users can only interact with files and folders located within their home directory. Access cannot be granted to files or folders outside a user's home directory.

## Managing Access

Access is assigned at both the user and group levels. The precedence rules:

* User-level access always overrides group-level access. If a user has specific access to a folder, that access remains in effect even when their group has different access settings for the same folder.
* When a user belongs to multiple groups with conflicting access to a folder, the system applies the access from the most recently assigned group.

Apply the multi-group rule carefully when managing complex group structures.

## Standard File Operations Matrix

In order to perform standard file operations, the user must have specific rights, either from their user permissions or through access.

| Action                  | Required Rights                 |
| ----------------------- | ------------------------------- |
| See items in a folder   | List Contents                   |
| Download                | List Contents, Download         |
| Create a new folder     | Upload                          |
| Upload a file           | Upload                          |
| Overwrite a file        | Upload                          |
| Rename an item          | Upload, Delete                  |
| Move or Copy            | List Contents, Download, Upload |
| Delete a file or folder | Delete                          |


# SSH Key Authentication

SSH keys authenticate SFTP sessions in place of passwords. Keys are harder to compromise than passwords, and they let automated scripts authenticate without storing a password anywhere.

## Why Use SSH Keys?

Many organizations rely on automated scripts to handle file transfers over SFTP. When scripts use password-based authentication, the password has to live somewhere the script can read it, which creates a risk of exposure through plain-text files, shared storage, or version control.

SSH key authentication removes that risk. Scripts no longer carry a password, credentials are less likely to leak, and authentication for automated and scheduled transfers stays consistent across runs.

## Steps for Adding SSH Key Authentication

Enabling SSH key authentication is a straightforward process. First, [create or obtain](#creating-ssh-keys) a keypair. Next, [upload the public key](#uploading-your-key) to the `.ssh` directory in your home folder using SFTP. After that, configure your SFTP client to [use your private key for authentication](#using-your-key).

### Creating SSH Keys

The exact steps for creating a key depend on your environment. See the appropriate guide for your situation.

* [Creating an SSH Key on Windows](/using-exavault/users/ssh-key-authentication/creating-an-ssh-key-on-windows)
* [Creating an SSH Key on Linux](/using-exavault/users/ssh-key-authentication/creating-an-ssh-key-on-linux)
* [Creating an SSH Key on macOS](/using-exavault/users/ssh-key-authentication/creating-an-ssh-key-on-macos)

### Uploading Your Key

To use your key with ExaVault, first connect to the system through SFTP using a password.

When you connect to SFTP, a virtual directory named `.ssh` appears in your home folder. Upload your public key file to that directory. This step is only available over SFTP — the `.ssh` directory does not appear in the web interface or other access methods.

### Using Your Key

After your public key is in the `.ssh` directory, configure your SFTP client to use your private key for authentication. The exact steps vary by SFTP client.

Command-line clients on Linux and macOS accept the `-i` or `--identity-file` parameter to specify the private key:

`sftp -i /path/to/my_ssh_key.key username@MYCOMPANY.files.com`

## Removing Your Key

To disable access for a particular SSH key, connect to the SFTP server and delete the public key from the `.ssh` directory in your home folder.

## Supported Key Types

ExaVault supports two SSH key formats: RSA and ed25519.

All public keys must be provided in OpenSSH format when uploading or configuring them in your user profile or automation system.

## SSH Keys Come In Pairs

An SSH key is a matched pair: a public key and a corresponding private key. Generating an SSH key always produces both halves together.

The private key must never be shared. It stays under the control of the user, script, or system that connects to the SFTP account. The private key is the equivalent of your password and is protected the same way.

The public key can be shared with any system that needs to grant secure access to the holder of the corresponding private key. The public key does not need to be kept secret and can be distributed freely. The public key has no power, authorization, or authority without the corresponding private key.

Never share a private key. When exchanging SSH keys for use with SFTP or SSH access, only send the public key.

## No Shell Access

SSH keys grant access to the SFTP service only. Even with a valid key, users cannot open an interactive shell or terminal session on the server. The environment is restricted to file transfer.


# Creating an SSH Key on Windows

The steps for generating an SSH keypair on Windows will be different depending on whether you are using a [modern Windows installation](#modern-windows-systems), such as Windows 11, or an [older version of Windows](#older-windows-systems).

## Modern Windows Systems

The easiest way to create an SSH key on Windows is with the built-in `ssh-keygen` utility that comes with Windows 10/11 as part of OpenSSH. Open PowerShell or Windows Terminal and run this command.

```
ssh-keygen
```

You'll be prompted for a filename, which tells `ssh-keygen` where to store your generated public and private keys and determines the first part of the file names. If you accept the default, your private key will be `C:\Users\<YourName>\.ssh\id_rsa` and your public key will be `C:\Users\<YourName>\.ssh\id_rsa.pub`.

`ssh-keygen` also prompts you for a passphrase, which is not the same as your account password. The SSH key passphrase is optional. If you supply a passphrase, you will need to enter the passphrase every time you authenticate using your key.

Upload your public key to your account, and add your private key to your SFTP client. Never give your private key to anyone.

## Older Windows Systems

If you're using an older version of Windows (such as Windows 7 or early Windows 10) that doesn't have OpenSSH built-in, the easiest method to generate SSH keys is with [PuTTYgen](https://www.chiark.greenend.org.uk/~sgtatham/putty/latest.html), part of the PuTTY suite.

1. Download PuTTYgen from the [PuTTY site](https://www.chiark.greenend.org.uk/~sgtatham/putty/latest.html). You can download either the full Windows Installer, which includes PuTTYgen, or just the standalone `puttygen.exe`.
2. Run `puttygen.exe`.
3. Select **RSA** for the key type. `4096` bits is recommended.
4. Click to generate the keypair.
5. Move your mouse to generate randomness.
6. Optionally add a comment to the key. The comment does not impact how the key works.
7. Optionally add a passphrase. If you supply a passphrase, you will need to enter it every time you authenticate using your key.
8. Copy the contents of the "Public key for pasting into OpenSSH authorized\_keys file" box. Paste those contents into a text file. This is the public key you will upload to ExaVault.
9. Save your private key using the **Save private key** button.

Upload the key from step 8 to your account, and add your private key to your SFTP client. Never give your private key to anyone.


# Creating an SSH Key on Linux

The easiest way to generate an RSA key pair on Linux is by using the built-in ssh-keygen tool in the terminal. It's fast, doesn't require installing anything, and works on all mainstream Linux distributions.

Using a terminal, enter the command:

```
ssh-keygen -t rsa -b 4096 -C "your_email@example.com"
```

Replace *<your_email@example.com>* with your own email, or another comment identifying your key.

You'll see a prompt like:

```
Enter file in which to save the key (/home/yourname/.ssh/id_rsa):
```

Press Enter to accept the default, or enter a custom path. The path must be in a restricted directory that others do not have permission to access.

When prompted to enter a passphrase, you can press enter to skip, or supply a passphrase. This is not the same as your ExaVault account password.

The process generates two files: a private key with no extension, and a public key with the extension `.pub`.

Upload your public key to your account, and add your private key to your SFTP client. Never give your private key to anyone.


# Creating an SSH Key on macOS

Macs come with `ssh-keygen`, part of the OpenSSH suite. Use it to generate an RSA key pair in the terminal.

In a terminal window, run the command:

```
ssh-keygen -t rsa -b 4096 -C "your_email@example.com"
```

Replace *<your_email@example.com>* with your own email, or another comment identifying your key.

You'll see a prompt like:

```
Enter file in which to save the key (/Users/yourname/.ssh/id_rsa):
```

Press Enter to accept the default, or enter a custom path. Keep the path in a restricted directory that others do not have permission to access.

When prompted for a passphrase, press Enter to skip, or supply a passphrase. This is not the same as your ExaVault account password.

The process generates two files: a private key with no extension, and a public key with the extension `.pub`.

Upload your public key to your account, and add your private key to your SFTP client. Never give your private key to anyone.


# Export List of Users and Groups

Administrators can export a list of users and a list of user groups on their site.

The *Export List* feature is located on the *Users* page of your site. You can choose to export a list of Groups or Users, in either CSV or XML format.

Exporting a list of Groups will include a list of all groups, and the users that are members of each group.

Exporting a list of Users will include a list of all users along with additional details for each user.


# Two-Factor Authentication (2FA)

Two-factor authentication (2FA) adds a second credential to the login flow, so a stolen password alone isn't enough to access an account. As a form of multi-factor authentication, it requires users to provide two different types of credentials to log in:

1. Something they know, typically their password.
2. Something they have, such as a smartphone, email account, or an authenticator app.

Enabling 2FA is one of the most effective ways to protect your data and reduce the risk of unauthorized access to your ExaVault account.

When enabled, two-factor authentication applies to logins to the web interface. After entering their username and password, users are prompted for a second verification method, depending on their chosen 2FA setup.

## Who Can Use 2FA

Any user who can set their own password can also configure 2FA from their User Profile. Each user manages their own 2FA setup; neither administrators nor other users can view or modify another user's 2FA configuration. 2FA credentials stay private even from administrators.

## Is 2FA Required?

2FA is optional. If your organization requires 2FA for compliance or internal security policies, each user must enable and configure 2FA on their own account.

ExaVault does not have a setting that mandates 2FA across all users. Adoption is driven through policy or onboarding workflows.

## Supported 2FA Methods

ExaVault offers three methods your users can choose from to meet their needs.

### Authenticator Apps <a href="#authenticator-apps-that-use-totp-time-based-onetime-password" id="authenticator-apps-that-use-totp-time-based-onetime-password"></a>

These are apps that use TOTP (time-based one-time password), such as Google Authenticator, Duo, and Authy. Authenticator apps are typically installed and used on mobile devices.

If you've lost access to your authenticator app, you can receive a backup code via email during the login process.

### SMS (Text Messages) <a href="#sms-text-messages" id="sms-text-messages"></a>

This method is less secure than an authenticator app but still offers greater security than a password alone.

If you've lost access to your phone, you can receive a backup code via email during the login process.

### Email Verification <a href="#email-verification" id="email-verification"></a>

With this method, the user supplies a code sent to them via email each time they attempt to connect. Like SMS, email-based 2FA is less secure than other options but still better than relying on a password alone.


# Single Sign On (SSO), SAML, SCIM

Single Sign-On (SSO) lets a user's identity be managed by a single, trusted identity provider that grants access to multiple service providers. It improves security and compliance posture and reduces the number of credentials each user has to manage.

ExaVault supports SP (Service Provider) initiated SSO flow and integrates with the most popular SSO providers.

## Steps to Perform on Entra

First, add the SmartFile (the former name for ExaVault) application from the Entra enterprise application gallery. Please refer to [Microsoft's SmartFile tutorial](https://learn.microsoft.com/en-us/entra/identity/saas-apps/smartfile-tutorial#add-smartfile-from-the-gallery) for more information on how to complete this step.

Once the ExaVault application has been added to your Entra Enterprise applications list, click the application and click *Assign Users and Groups* to select the Entra users that will be signing into ExaVault using Entra SSO.

Click *Setup single sign on* and choose *SAML*. In the *Basic SAML Configuration* section, provide the following values:

* **Identifier (Entity ID):** Your ExaVault site domain, without the `https://` prefix.
* **Reply URL (Assertion Consumer Service URL):** `https://<DOMAIN>/saml2/acs`
* **Sign on URL:** `https://<DOMAIN>/ftp/login`

In the section *SAML Certificates*, download the *Federation Metadata XML* file so that it may be uploaded to your ExaVault site.

## Steps to Perform on ExaVault

Sign into your ExaVault account as an administrator and go to *Admin Settings* by clicking the gear in the upper-right corner.

In the left pane, click *Settings > SSO*. Then click *Choose File* in the Metadata XML file and select the Federation Metadata XML file you downloaded from Entra. Click *Save* to complete the configuration.

For each user assigned to your SSO method, create or modify the user with their username and email address configured as the email used in Microsoft Entra and the sign on method set to *SSO*.

Your site's sign in page will now display a "Single Sign-On" button. Users will click on this button and be signed into ExaVault through Entra to their given account.

If a user gets a page saying that the account does not exist, ensure that the user's email is set as the ExaVault user's username and email.

## Configuring SCIM for User Provisioning

To setup SCIM automatic provisioning, follow the instructions in [Tutorial: Configure ExaVault for automatic user provisioning](https://learn.microsoft.com/en-us/entra/identity/saas-apps/smartfile-provisioning-tutorial).


# Active Directory & LDAP

Connect ExaVault to Active Directory or another LDAP directory to centralize authentication and directory data. Configuring the LDAP connection lets ExaVault use your LDAP server for user authentication only. If you want ExaVault to create and manage users and groups from Active Directory, also complete the AD sync settings on the same screen.

## How The LDAP Screen Works

The LDAP screen configures the connection to your LDAP or Active Directory server.

That same connection can serve two jobs.

* LDAP authentication validates a user's password against your directory at sign-in time. You still create and manage those users in ExaVault.
* Active Directory sync uses the LDAP connection to import users and groups from Active Directory. Active Directory becomes the source of truth for synced users and groups.

If you only need centralized password validation, [configure LDAP Authentication](#configuring-ldap-servers) and stop there.

If you also need automatic user and group provisioning, [configure Active Directory Sync](#configuring-active-directory-sync), which requires more information.

## How LDAP Authentication Works

LDAP Authentication occurs when an [ExaVault user configured for *Active Directory & LDAP*](#configure-a-user-to-use-ldap-authentication) attempts to log in.

ExaVault authenticates by binding to your LDAP server with the username the user enters and the password they provide.

ExaVault only attempts LDAP authentication for users that already exist in ExaVault and are configured to use LDAP authentication. If the user does not exist locally, ExaVault rejects the login attempt without contacting your LDAP server.

ExaVault supports multiple LDAP servers per site. When a user logs in who has their *Authentication* set to *Active Directory & LDAP*, ExaVault tries each [configured LDAP server](#configuring-ldap-servers). When authentication fails against one server, ExaVault attempts the next server in order.

After a successful LDAP bind, ExaVault still enforces ExaVault account checks. An account that is valid in your LDAP but expired or disabled cannot log in to ExaVault.

## How Active Directory Sync (AD Sync) Works

Active Directory sync adds automatic user and group provisioning to your LDAP configuration. Use this when you already need LDAP or Active Directory connectivity and you want Active Directory to control user lifecycle and group membership in ExaVault.

Active Directory sync manages user and group records. It does not validate user passwords at sign-in time.

ExaVault sync starts from the Active Directory security group that you choose. ExaVault finds that group by matching its Active Directory Common Name (CN) to the configured Group in the [LDAP Server Configuration](#ldap-screen-configuration-fields).

ExaVault imports all direct members of that group. ExaVault also imports nested groups by processing group membership recursively.

ExaVault treats Active Directory as the source of truth for synced objects.

* ExaVault creates or updates groups it finds in Active Directory.
* ExaVault creates or updates users it finds in Active Directory.
* ExaVault disables previously synced users that do not appear in the current sync.
* ExaVault deletes previously synced groups that do not appear in the current sync.

ExaVault treats synced groups as AD-managed groups. ExaVault removes non-synced users from AD-managed groups during sync.

ExaVault ignores machine accounts.

## LDAP Configuration Screen

<table><thead><tr><th>Field</th><th>Details</th><th width="100">Used for</th></tr></thead><tbody><tr><td>AD/LDAP Server Name</td><td>Human-readable name for your LDAP server</td><td>LDAP &#x26;<br>AD Sync</td></tr><tr><td>AD/LDAP Server</td><td>Address of your LDAP server, starting with <code>ldap://</code> or <code>ldaps://</code></td><td>LDAP &#x26;<br>AD Sync</td></tr><tr><td>Port</td><td>Port number for the server. Usually Port <code>389</code> for <code>ldap://</code> or Port <code>636</code> when using TLS/SSL</td><td>LDAP &#x26;<br>AD Sync</td></tr><tr><td>Security Level</td><td>What kind of encryption is used for the server. Choices are <code>None</code>, <code>SSL</code> or <code>TLS</code>.</td><td>LDAP &#x26;<br>AD Sync</td></tr><tr><td><a href="#username-prefix-and-username-suffix">Username Prefix</a></td><td>Text to add before the username when querying the server.</td><td>LDAP &#x26;<br>AD Sync</td></tr><tr><td><a href="#username-prefix-and-username-suffix">Username Suffix</a></td><td>Text to add after the username when querying the server.</td><td>LDAP &#x26;<br>AD Sync</td></tr><tr><td>Group</td><td>The common name (CN) of an AD Security Group. Only users and sub-groups that are members of this group will be imported. Defaults to ExaVault.</td><td>AD Sync</td></tr><tr><td>Service account username</td><td>Service account</td><td>AD Sync</td></tr><tr><td>Service account password</td><td>Password for service account.</td><td>AD Sync</td></tr><tr><td>Base DN</td><td>The base DN from which all LDAP searches are performed. Example:<br><code>DC=corp,DC=example,DC=com</code></td><td>LDAP &#x26; AD Sync</td></tr><tr><td>User E-mail Field</td><td>Whether to map users by UPN or Email.</td><td>AD Sync</td></tr><tr><td>Certificate Name</td><td>Filename of a client certificate placed in <code>/etc/ssl/</code>.</td><td>LDAP &#x26;<br>AD Sync</td></tr></tbody></table>

### Username Prefix & Username Suffix

The Username Prefix and Username Suffix fields are used to format the bind username when querying the LDAP server during authentication.

ExaVault concatenates them in the order `Username Prefix` + `Username` + `Username Suffix` to form the bind username used for the LDAP query.

ExaVault supports 3 different styles of bind username formats you can choose from:

* NetBIOS domain format: set *Username Prefix* to `DOMAIN\` and leave *Username Suffix* empty.
* UPN format: leave *Username Prefix* empty and set *Username Suffix* to `@your-domain`.
* Distinguished name format: set *Username Prefix* and *Username Suffix* so the result is a full DN. example: set Username Prefix to `uid=` and Username Suffix to `,ou=people,dc=example,dc=org` to get the full DN.

## Configuring LDAP Servers

To configure LDAP authentication, you will need:

* Server Details: Address, port number, and encryption method (None, SSL, or TLS).
* User Mapping: Whether to use the Local Email or UserID as the UPN.
* Binding Strings: The specific Prefix and Suffix strings used to format the UPN for your directory.

Add the information on the *LDAP* screen under *Admin Settings*. Complete the fields listed as "LDAP & AD Sync" in the [Configuration](#ldap-configuration-screen) table.

## Configuring Active Directory Sync

Active Directory sync uses the LDAP server configuration for connectivity. Complete the fields needed for LDAP authentication on the *LDAP* Screen in *Admin Settings:*

* Server Details: Address, port number, and encryption method (None, SSL, or TLS).
* User Mapping: Whether to use the Local Email or UserID as the UPN.
* Binding Strings: The specific Prefix and Suffix strings used to format the UPN for your directory.

The sync process also requires service account info and the Active Directory group name.

Supply the *Service account username* used to bind to Active Directory during the sync. It also uses the [*Username Prefix* & *Username Suffix*](#username-prefix-and-username-suffix) during the bind.

Set the *Group* name to the Common Name (CN) of the Active Directory security group that will be synced to ExaVault. Only users and sub-groups that are members of this group will be imported into ExaVault.

## Configure A User To Use LDAP Authentication

To use LDAP Authentication for a user, add their user record within ExaVault, and set their *Authentication* to *Active Directory & LDAP*. Don't assign a password within ExaVault, because their credentials will be sent to the LDAP server during authentication.


# Troubleshooting LDAP

When LDAP authentication fails, the cause is almost always network connectivity, encryption settings, or bind credentials. Working through these in order isolates whether the problem is a firewall, a certificate mismatch, an incorrect Distinguished Name (DN), or an incorrect ExaVault User configuration.

## Verify Network Connectivity

Your ExaVault server must be able to reach the [LDAP server address](/using-exavault/users/active-directory-and-ldap#ldap-configuration-screen) on the port used for connecting to LDAP.

## Test LDAP Binding

From the ExaVault Server, run a search against your LDAP server using the `ldapsearch` command-line tool. Compose the bind DN using the same [*Username prefix and Username suffix*](/using-exavault/users/active-directory-and-ldap#username-prefix-and-username-suffix) from your [LDAP configuration](/using-exavault/users/active-directory-and-ldap#ldap-configuration-screen).

## Common LDAP Error Codes

<table><thead><tr><th width="249.36248779296875">Code</th><th>Name</th><th>Common Causes</th></tr></thead><tbody><tr><td>49</td><td><code>Invalid Credentials</code></td><td>The most common. Either the password is wrong, or the "Bind DN" (the user path) is formatted incorrectly.</td></tr><tr><td>32</td><td><code>No Such Object</code></td><td>The server is reached, but the user or the "Base DN" you provided doesn't exist in the directory.</td></tr><tr><td>81</td><td><code>Server Down</code></td><td>The client can't reach the server. This is usually a firewall issue, a wrong port (389 vs 636), or the LDAP service isn't running.</td></tr><tr><td>34</td><td><code>Invalid DN Syntax</code></td><td>Your prefix or suffix string has a formatting error, such as a missing comma or a stray space.</td></tr><tr><td>53</td><td><code>Unwilling to Perform</code></td><td>The server understood you but refused. This often happens if you try to bind over port 389 (insecure) but the server policy requires SSL or TLS.</td></tr></tbody></table>

## Troubleshooting User Authentication

Before investigating a user's failed logins, confirm the LDAP server is correctly defined and [can be reached](#verify-network-connectivity) from the ExaVault host machine on the required port.

### User Cannot Login

The user must already exist in ExaVault to authenticate. If you are using Active Directory sync, wait for the sync process to complete.

If the user exists, verify the Authentication method is *Active Directory & LDAP* in their user settings.

To confirm the credentials are valid, use the `ldapwhoami` command-line tool. It is the quickest way to troubleshoot login errors.

If the user exists locally and the password is correct, LDAP bind failures come from bind username formatting or connection security mismatches. Check the [*Username prefix and Username suffix*](/using-exavault/users/active-directory-and-ldap#username-prefix-and-username-suffix) from your [LDAP configuration](/using-exavault/users/active-directory-and-ldap#ldap-configuration-screen).

### Users Do Not Appear In ExaVault After Sync

Verify that the configured AD [security group](/using-exavault/users/active-directory-and-ldap#configuring-active-directory-sync) exists and that its Name (CN) matches the configured group name.

Verify that the user is a direct or nested member of that group.

### Users Get Disabled Unexpectedly

ExaVault disables any previously synced user that does not appear in a sync run.

Verify that the user remains a member of the configured AD security group.

Verify that the user account is enabled in Active Directory.


# Links (Share Links)

Links are secure, web-accessible URLs that let external contacts (people without a user account) access or upload files and folders.

They are ideal for one-time sharing, ad hoc file delivery, or collecting files from outside parties, especially when email attachments are not viable due to size limits.

There are no size limits for individual files shared via links, and links can be created for folders of any size.

## Common Use Cases

* Sending large files without worrying about email attachment restrictions
* Allowing clients or vendors to upload files into a designated folder
* Creating a simple, branded upload portal by placing your link in your email signature
* Sharing project folders with external stakeholders

## Creating and Managing Links

Users who have permission to create public links can generate a link for any item they have access to.

Each link is owned by the user who created it. If that user is later disabled, the link becomes inactive. Administrators can see, edit, and remove links created by other users.

## Linking to Folders

When linking to a folder:

* By default, the link allows the folder to be downloaded.
* You can configure the link to allow uploads only, with no download access.
* You can enable both uploads and downloads, provided the link creator has upload permissions to the folder.

By default, folder links do not expose subfolder contents. This is helpful when you want to contain public uploads in a top-level folder while internal teams sort and organize files into subfolders that remain private.

If you'd prefer a two-way data room experience, you can configure the link to allow access to subfolders. In that case, the visitor inherits the same access level to all subfolders as they have to the root folder of the link.

## Security and Expiration Options

Links are flexible but secure. You can control access in several ways:

* Password protection. Add a password to limit access to intended recipients only. Administrators can enforce site-wide policies requiring passwords for all links.
* Download limits. Set a maximum number of allowed downloads. Once the limit is reached, the link becomes inactive.
* Expiration date. Configure links to expire after a certain date. Expired links cannot be accessed, but they can be reactivated by updating the expiration settings.

## Direct Download URLs

To bypass the user interface presented in a Share Link and instead directly download a file from a URL, you can append the exact file name to the end of the link URL. When this method is used, the file download begins immediately, without first displaying a user interface in the browser.

To support legacy URLs, generated by previous versions of ExaVault, you may also use a legacy structure where you append `/api/2/`or `/api/3/`before the link and add `?download=true`to the end of the link.


# Notifications

ExaVault notifications send emails when activity on your account requires your attention, like a file being deleted from a shared folder or a document being uploaded to a time-critical project.

Notifications are delivered as digests on a schedule you choose, from every few minutes to every few days.

## Path Notifications

Path notifications generate emails when file activity occurs within a specified path, or within every path the user has permission to access. File activity from any user or external contact that matches the path notification is included. Notifications can be triggered by any combination of file activities: creating a new file, overwriting a file, reading a file, moving a file, copying a file, or deleting a file.

Emails are only sent to users for activity within their home directory.

## User Notifications

User notifications monitor what a user does and what changes are made to one or all user accounts.

The activities that can trigger the notification are any combination of authentication activity (logging in or logging out), changes to a user account (new user created, user updated, user deleted), and file activities (creating a new file, overwriting a file, reading a file, moving a file, copying a file, or deleting a file).

When you create a notification for any user, it is triggered by all users logging in or logging out, and by any changes made to any user accounts. The notification email includes file activities only when the paths are accessible to the user who receives the notification.

## Group Notifications

Group notifications monitor what a group member does and what changes are made to one or all user groups.

The activities that can trigger the notification are any combination of changes to a user group (new group created, group edited, group deleted), and file activities by a group member (creating a new file, overwriting a file, reading a file, moving a file, copying a file, or deleting a file).

When you create a notification for any group, it is triggered by any changes made to any user groups. The notification email includes file activities only when the paths are accessible to the user who receives the notification.

One use for group notifications is to monitor exchange flows with external parties. Create a group that represents the external users who connect to your site, then add the relevant user accounts to that group. Create a group notification triggered when a member of that group downloads or uploads, and the activity is sent to the users responsible for monitoring the flows. Users who receive the notifications are notified only about activity in the paths they can access.

## Link Notifications

Link notifications generate emails when a share link is visited by a web visitor, so the sender can track whether a recipient has received the link.


# Ciphers

Ciphers are the encryption algorithms used to protect data in transit to and from ExaVault over SSL and TLS.

### TLS v1.2 <a href="#cipher-list" id="cipher-list"></a>

ExaVault On Premise servers support the following ciphers for TLS v1.2:

`TLS_ECDHE_RSA_WITH_3DES_EDE_CBC_SHA`

`TLS_ECDHE_RSA_WITH_AES_128_CBC_SHA`

`TLS_ECDHE_RSA_WITH_AES_128_CBC_SHA256`

`TLS_ECDHE_RSA_WITH_AES_128_GCM_SHA256`

`TLS_ECDHE_RSA_WITH_AES_256_CBC_SHA`

`TLS_ECDHE_RSA_WITH_AES_256_CBC_SHA384`

`TLS_ECDHE_RSA_WITH_AES_256_GCM_SHA384`

`TLS_ECDHE_RSA_WITH_RC4_128_SHA`

`TLS_RSA_WITH_3DES_EDE_CBC_SHA`

`TLS_RSA_WITH_AES_128_CBC_SHA`

`TLS_RSA_WITH_AES_128_CBC_SHA256`

`TLS_RSA_WITH_AES_128_GCM_SHA256`

`TLS_RSA_WITH_AES_256_CBC_SHA`

`TLS_RSA_WITH_AES_256_CBC_SHA256`

`TLS_RSA_WITH_AES_256_GCM_SHA384`

`TLS_RSA_WITH_CAMELLIA_128_CBC_SHA`

`TLS_RSA_WITH_CAMELLIA_256_CBC_SHA`

`TLS_RSA_WITH_IDEA_CBC_SHA`

`TLS_RSA_WITH_RC4_128_MD5`

`TLS_RSA_WITH_RC4_128_SHA`

`TLS_RSA_WITH_SEED_CBC_SHA`

### TLS v1.1

ExaVault On Premise servers support the following ciphers for TLS v1.1:

`TLS_ECDHE_RSA_WITH_3DES_EDE_CBC_SHA`

`TLS_ECDHE_RSA_WITH_AES_128_CBC_SHA`

`TLS_ECDHE_RSA_WITH_AES_256_CBC_SHA`

`TLS_ECDHE_RSA_WITH_RC4_128_SHA`

`TLS_RSA_WITH_3DES_EDE_CBC_SHA`

`TLS_RSA_WITH_AES_128_CBC_SHA`

`TLS_RSA_WITH_AES_256_CBC_SHA`

`TLS_RSA_WITH_CAMELLIA_128_CBC_SHA`

`TLS_RSA_WITH_CAMELLIA_256_CBC_SHA`

`TLS_RSA_WITH_IDEA_CBC_SHA`

`TLS_RSA_WITH_RC4_128_MD5`

`TLS_RSA_WITH_RC4_128_SHA`

`TLS_RSA_WITH_SEED_CBC_SHA`

### SFTP

SFTP does not use TLS or SSL. It implements its own encryption standards and cipher naming.

By default, ExaVault On Premise servers support the following algorithms for SFTP:

<table data-header-hidden><thead><tr><th width="281">Type</th><th>Algorithms</th></tr></thead><tbody><tr><td><strong>Key Exchange</strong></td><td><p><code>curve25519-sha256@libssh.org</code></p><p><code>ecdh-sha2-nistp256</code></p><p><code>ecdh-sha2-nistp384</code></p><p><code>ecdh-sha2-nistp521</code></p><p><code>diffie-hellman-group16-sha512</code></p><p><code>diffie-hellman-group-exchange-sha256</code></p><p><code>diffie-hellman-group14-sha256</code></p><p><code>diffie-hellman-group-exchange-sha1</code></p><p><code>diffie-hellman-group14-sha1</code></p><p><code>diffie-hellman-group1-sha1</code></p></td></tr><tr><td><strong>Server Host Key Algorithms</strong></td><td><code>ssh-rsa</code></td></tr><tr><td><strong>Encryption</strong></td><td><p><code>aes128-ctr</code></p><p><code>aes192-ctr</code></p><p><code>aes256-ctr</code></p></td></tr><tr><td><strong>MAC</strong></td><td><code>hmac-sha1</code></td></tr></tbody></table>


# Customizing Your Site

Administrators can customize the appearance of their ExaVault site, including the company name, logo, icons, and color scheme.

These settings are found in the Admin Dashboard under *Admin Settings > Branding > Brand*.

As changes are made to the Color settings, the Site Preview section on the page shows how the new colors will be applied.

<table><thead><tr><th width="185">Setting</th><th width="165">Format/Size</th><th>Where Shown</th></tr></thead><tbody><tr><td><strong>Company Name</strong></td><td>Text, up to 32 alphanumeric characters</td><td>User's site's copyright notice (both site web pages and site emails).</td></tr><tr><td><strong>Logo</strong></td><td>PNG, JPG, GIF; no larger than 50px by 240px</td><td>Upper left corner of user's site (including login page and Links pages), site emails, and favicon (favorite icon) for Links pages.</td></tr><tr><td><strong>Mobile Icon</strong></td><td>PNG, JPG, GIF; square, no larger than 30px by 30px</td><td>Home screen or application drawer for mobile devices.</td></tr><tr><td><strong>FavIcon</strong></td><td>PNG, ICO; 16px by 16px square</td><td>Browser tab, browser's history/search results.</td></tr><tr><td><strong>Color 1</strong></td><td>HTML color code (hex format)</td><td>Left navigation bar (unselected menu option icon and text, and background for selected menu option), file path (for paths above the current path), background highlights for upper right menu bar, some 3rd party copyright notices), background for dialog boxes.</td></tr><tr><td><strong>Color 2</strong></td><td>HTML color code (hex format)</td><td>Button backgrounds for non-cancel style buttons.</td></tr><tr><td><strong>Color 3</strong></td><td>HTML color code (hex format)</td><td>File path (for the current path), Upload button background (within popup dialog boxes), page titles.</td></tr></tbody></table>


# Login Page

Administrators can customize the appearance of their site's login page.

These settings live in the Admin Dashboard under *Admin Settings > Branding > Login*. The Login Preview section on the page renders a live representation of each change as it's applied.

ExaVault supplies a set of stock background images that Administrators can select from. A solid color is also available as a background option.

When *Color* is selected as the background option, the Administrator picks a solid color in [HTML Hex format](https://www.w3schools.com/html/html_colors_hex.asp) for the login page background. Selecting a background image overrides the background color.

A custom background image can also be uploaded. The file must be PNG, JPG, or GIF, and no larger than 2880 pixels wide by 1800 pixels tall.


# Contact Information

ExaVault Administrators can customize the contact information that is found at the bottom of emails sent for user-based administrative actions (such as creating a new user or updating an existing user) when the Administrator elects to notify users of such changes via email.

These settings are found in the Admin Dashboard under *Admin Settings > Branding > Contact.*

The following fields can be customized:

<table><thead><tr><th width="175">Setting</th><th>Usage</th></tr></thead><tbody><tr><td>Support Email</td><td>The email address that your users can email for support</td></tr><tr><td>Support Phone</td><td>The phone number that you want users to call for support. This field can include extensions.</td></tr><tr><td>Support URL</td><td>The website where your users can find support information or submit support tickets for your organization.</td></tr><tr><td>Support Fax</td><td>This field is no longer in use.</td></tr><tr><td>From Email</td><td>The reply-to email address that will be used if the notified user replies to the email.</td></tr></tbody></table>

Once these settings have been changed, future user-based administrative emails will reflect the new settings.


# Custom CSS

Administrators can supply custom CSS that overrides elements of their site's pages. The settings live in the Admin Dashboard under *Admin Settings > Branding > CSS*.

Before changing a site's CSS, review the ExaVault Site Branding documentation. Many appearance options are already configurable there without writing CSS.

This is an advanced feature. Incorrect CSS definitions can make the site unusable.

The following example reduces the padding on the tabs at the top of the Site Branding configuration screen, producing a slightly more compact tab strip:

```
.nav > li > a {
  padding: 5px; 5px;
}
```

The full collection of CSS selectors is available at `https://[your_domain]/ftp/static/css/site.css`.


# Custom Terms of Use Agreement

Administrators can create a customized Terms of Use Agreement that new users must agree to before using the site.

The agreement carries any organizational policy the administrator wants new users to accept: acceptable use, dispute resolution, unacceptable content, instructions for obtaining support, or anything else.

New users are required to agree to the terms before accessing the site for the first time.

The Terms of Use Agreement is configured in the Admin Dashboard, under *Admin Settings > Settings > Terms*.


# Connection Methods


# SFTP

SFTP is a common protocol for business-to-business file transfer integration, and ExaVault supports it as a first-class connection method.

## Connection Settings

Two values configure an SFTP client to reach your ExaVault appliance: the hostname and the port.

### Hostname

Connect with SFTP to the fully qualified domain name of your appliance. If your client requires an IP address for the connection, connect using the external IP address configured in the appliance manager.

### Port

For SFTP connections, use port `22`.

## SCP (Secure Copy) Protocol

ExaVault's SFTP server also supports the SCP protocol, another file transfer protocol built on top of SSH. In most interactions with ExaVault, SCP works the same as SFTP.

## SSH Restrictions

Functionality is restricted to file transfer capabilities only: SFTP and SCP for moving files, and SSH keys for authentication. No other SSH services are provided. Shell access and SSH tunneling are not available.

Security scans detect SSH availability as a "false positive" result, because SFTP and SCP are subsets of SSH functionality. No SSH capabilities beyond those required by SFTP and SCP are available on the ExaVault platform.


# Supported SSH Ciphers

The SSH ciphers below are supported for use with SFTP.

## Key Exchange Algorithms

* <curve25519-sha256@libssh.org>
* curve25519-sha256
* ecdh-sha2-nistp256
* ecdh-sha2-nistp384
* ecdh-sha2-nistp521
* diffie-hellman-group14-sha256
* diffie-hellman-group15-sha512
* diffie-hellman-group16-sha512
* diffie-hellman-group17-sha512
* diffie-hellman-group18-sha512

## Host Key Algorithms

* ssh-rsa
* rsa-sha2-512
* rsa-sha2-256

## Encryption Algorithms

* <aes128-gcm@openssh.com>
* <aes256-gcm@openssh.com>
* aes128-ctr
* aes192-ctr
* aes256-ctr

## MAC Algorithms

* <hmac-sha2-256-etm@openssh.com>
* <hmac-sha2-512-etm@openssh.com>
* <hmac-sha1-etm@openssh.com>
* hmac-sha2-256
* hmac-sha2-512
* hmac-sha1

## Compression Algorithms

* none

The host key length is 4096 bits, which is too large for some older SFTP clients. Use a version of your SFTP client or client library that the vendor currently supports.


# Maximizing SFTP Performance

SFTP has poor performance characteristics due to limitations in the design of the protocol. The steps below will help you get the most out of SFTP.

## Maximize the Buffer Size (Data Chunk Size) in Your SFTP Client

Most SFTP clients send data in chunks of 32 kilobytes. That is a very low size for today's internet.

Increase this size by 4-32x in your client. The process requires some trial and error to optimize in SFTP. Other protocols handle this automatically.

If you are using the command line `sftp` tool, set the buffer size using the `-B` option: `sftp -B 128000 username@MYCOMPANY.com`

For any other client, look for settings related to buffer size or data chunk size and raise them.

## Use Many Parallel Connections

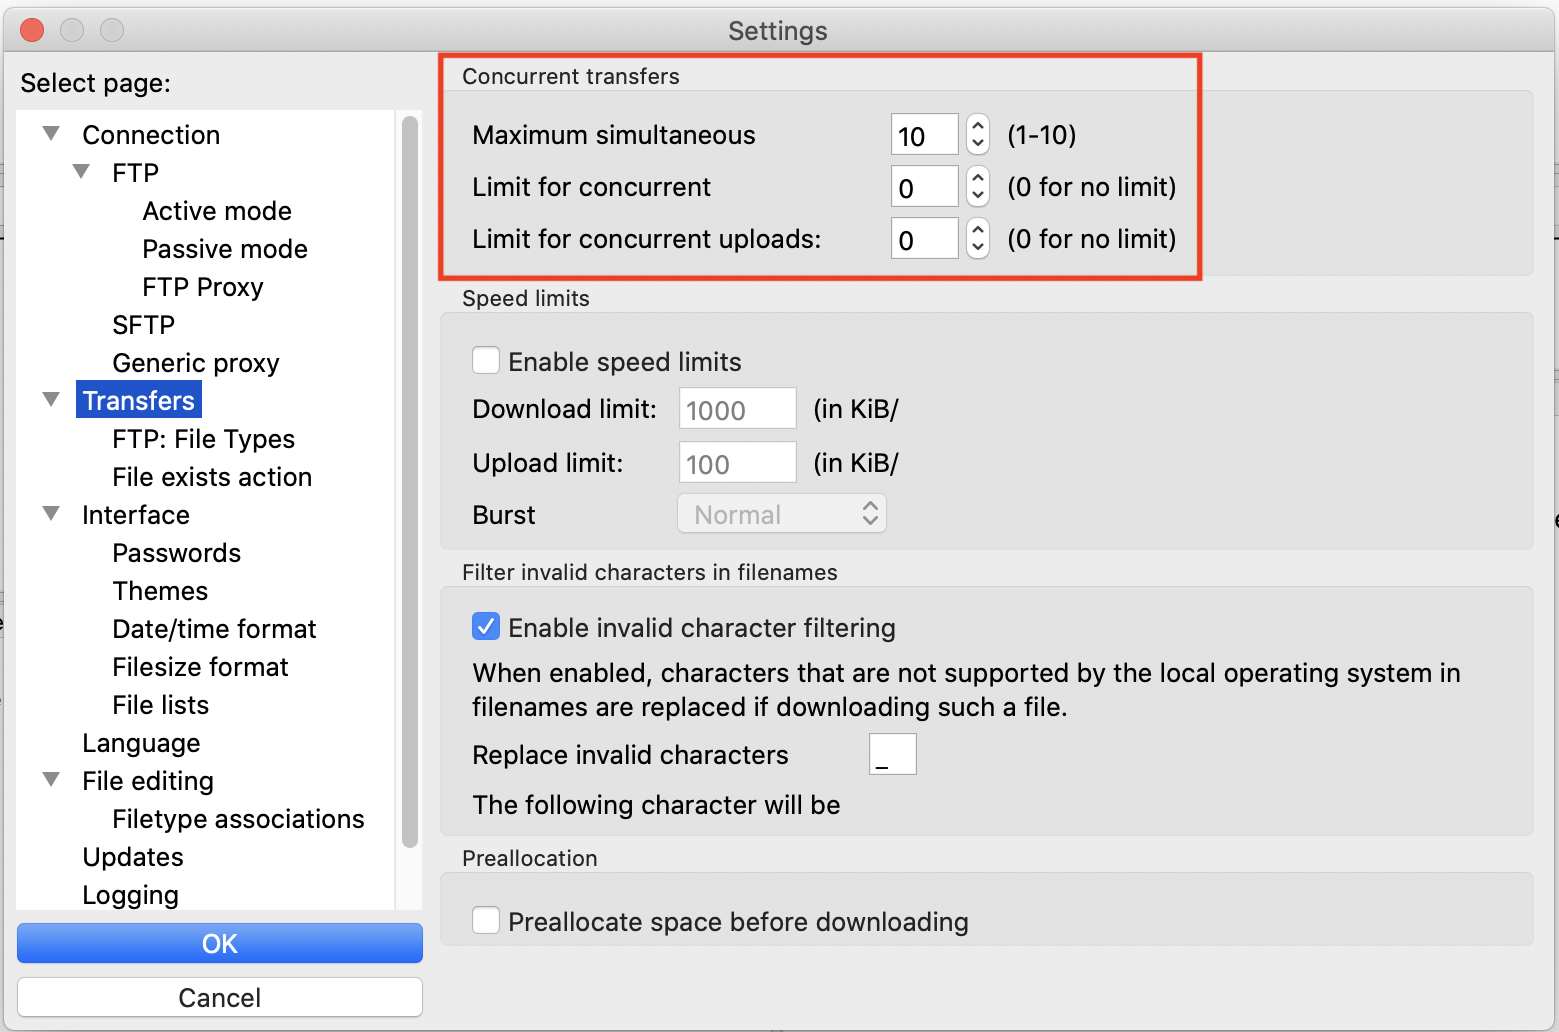
Set the number of simultaneous connections to 10-25 or the maximum supported by your SFTP app.

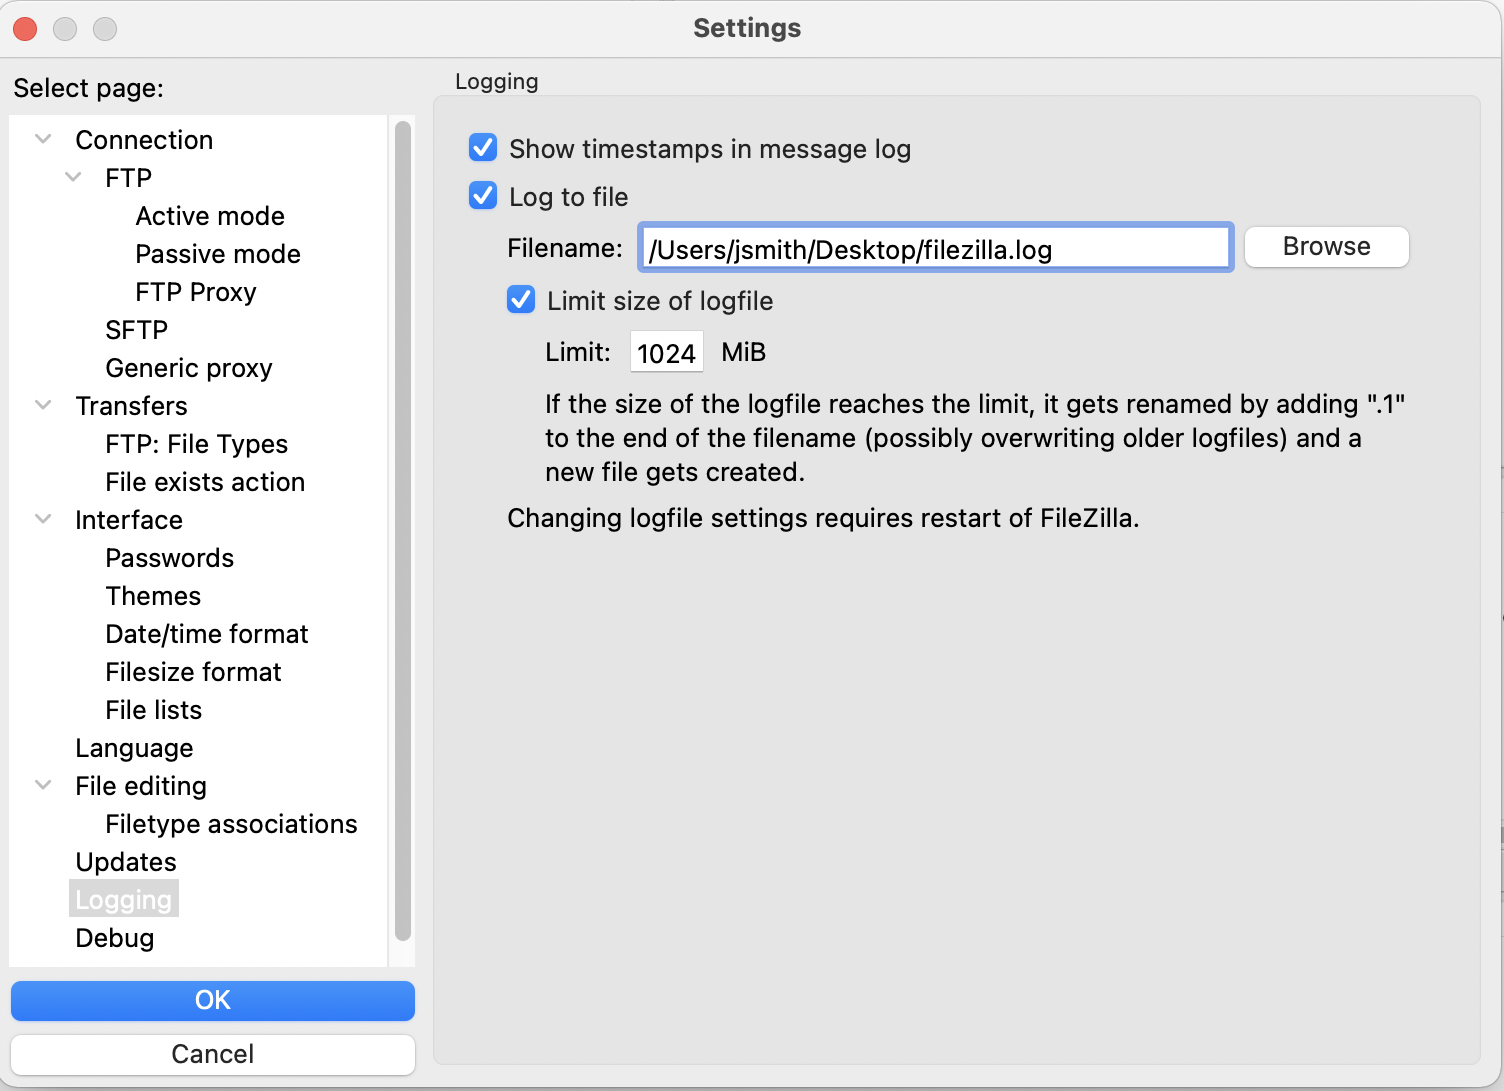
In FileZilla, open *Edit > Settings > Transfers* and increase the *Maximum simultaneous transfers* setting to 10.

In Cyberduck, open *Edit > Preferences > Transfers* and set *Transfer Files* to "Open multiple connections". Then open *Window > Transfers* and increase the counter in the lower right to the maximum.

Increasing the number of simultaneous connections helps when uploading multiple files at the same time but has no effect when uploading a single file.

## Minimize Network Latency

Network latency is the round-trip delay between sending data across a network and receiving a reply that the data was received. Higher latency, also known as "lag", can be caused by:

* physical limitations of your network connection.
* how much data is currently saturating your network connection.
* the network distance between you and your destination.
* network tools and software that regulate or restrict bandwidth usage.

Network latency has a large impact on SFTP performance. Use the best physical network available to you, and achieve the shortest network distance possible. A wired ethernet connection outperforms Wi-Fi.


# Command Line SFTP Examples

Many operating systems come with a built-in `sftp` command that can be used to connect and perform operations via SFTP.

### To Connect and Authenticate

To connect to ExaVault, specify your username and the fully qualified domain name (FQDN) of your ExaVault site, separated by an `@` character:

`sftp username@MYCOMPANY.com`

When prompted, enter your password.

### To Connect and Authenticate Using an SSH/SFTP Key

Save the SSH/SFTP Key to a file on your computer. For example, `my_ssh_key.key`.

Restrict access permissions on the key file so that only your user ID can access it. Remove access permissions for Groups and Everyone, leaving only read permission for yourself.

Connect to ExaVault and specify the Key file with the `-i` (identity file) flag.

For Mac/Linux:

`sftp -i /path/to/my_ssh_key.key username@MYCOMPANY.com`

For Windows:

`sftp -i C:\path\to\my_ssh_key.key username@MYCOMPANY.com`

### To Upload Files

Upload a single file using the `put` command:

`put file.ext`

Upload multiple files using the `mput` (multiple put) command:

`mput file1.ext file2.ext file3.ext`

Or use a wildcard to match and upload multiple file names:

`mput file*.ext`

#### To Upload a Folder

Create the destination folder using the `mkdir` (make directory) command, with a folder name that matches the name of the folder you're uploading:

`mkdir TheFolderName`

Then upload the folder contents using the `put -r` (put recursively) command:

`put -r TheFolderName/`

### To Download Files

Download a single file using the `get` command:

`get file.ext`

Download multiple files using the `mget` (multiple get) command:

`mget file1.ext file2.ext file3.ext`

Or use a wildcard to match and download multiple file names:

`mget file*.ext`

### To Download a Folder

Create the local destination folder using the `lmkdir` (locally make directory) command, with a folder name that matches the name of the folder you're downloading:

`lmkdir TheFolderName`

Set your local permissions using the `lumask` (locally set the mask for user permissions) command:

`lumask 002`

Download the folder contents using the `get -r` (get recursively) command:

`get -r TheFolderName/`

Setting the UMASK to 002 with `lumask` gives the downloaded files the correct permissions. Without this step, subfolders may be created while the files inside them fail to download due to permission errors.


# Troubleshooting SFTP

SFTP connection issues are usually caused by firewalls or incorrect settings in the SFTP client. The checks below cover the most common causes.

In most cases, the change that introduced the problem is on the client side. Work through the items below before contacting support.

## Check for Firewall Issues <a href="#check-for-local-network-firewall-issues" id="check-for-local-network-firewall-issues"></a>

Most SFTP support calls trace back to the corporate or network firewall on the customer's side or the counterparty's side. SFTP is a frequently restricted protocol, and firewall changes often introduce new complications.

### Have You Manually Allowlisted Any IP Addresses?

If you have, confirm that all of the appropriate IPs are allowlisted, not just some of them.

### Do You Need to Request an IP Allowlist?

If you have not allowlisted IP addresses, your firewall administrator may require an explicit allowlist for SFTP traffic. Submit a request to your network or firewall administrator to allow SFTP port `22` traffic to all of the IP addresses used by your server.

## Connection Settings in Your SFTP App <a href="#connection-settings-in-your-sftp-app" id="connection-settings-in-your-sftp-app"></a>

The settings below are the most common sources of SFTP connection problems. Double-check each one.

### Hostname

Connect with SFTP to the fully qualified domain name of your appliance. Do not include `https://` at the start of the address. If your client requires an IP address for the connection, connect using the external IP address configured in the appliance manager.

### Port

The default SSH/SFTP port is `22`. Many corporate firewalls block or interfere with port `22`.

### Timeout

If your app supports it, increase the connection timeout value to 60 seconds.

### Retry Logic

If your app supports it, configure three connection retries at 10-second intervals. This allows a failed connection to one server to retry against a different server.

### Keepalives

ExaVault times out SFTP sessions that have been idle for 120 seconds. This prevents unused sessions from holding server resources. Idle timeouts are normal, and most SFTP apps handle them without issue, but some apps do not. Many apps complete transfers in progress and then reconnect when the user issues another command. If your app aborts a transfer or errors out on the idle timeout message, configure keepalives (null packets or dummy commands) every 100 seconds to maintain the SFTP connection.

### Ciphers

Your SFTP app and ExaVault will only connect if both sides agree on a secure cipher. Insecure ciphers are rejected by either side. Make sure your SFTP app uses a [supported secure cipher](/connection-methods/sftp/supported-ssh-ciphers).

Check the documentation for your SFTP app to find out how to configure ciphers for your connection.

## ExaVault Configuration That May Be Relevant <a href="#configuration-on-filescom-that-may-be-relevant" id="configuration-on-filescom-that-may-be-relevant"></a>

If the items above check out, the remaining cause is often on the ExaVault side.

Verify that the username is enabled and that the username and password are correct. In the *Users* section, enabled users show a green check and disabled users show a red X. Select a disabled user and use *Enable/Disable* to enable them.

## Authentication or Invalid Username/Password Failure Messages <a href="#invalid-usernamepassword-failures" id="invalid-usernamepassword-failures"></a>

The SFTP protocol has a quirk that often confuses users troubleshooting authentication issues. The protocol uses integers internally to communicate authentication failure codes and does not allow services like ExaVault to return detailed error messages related to authentication.

This is in contrast to nearly every other protocol (our API, FTP, web, and so on), which all provide detailed messages explaining login failures.

Many SFTP clients fall back to a generic "authentication failure" or "invalid username/password" message for any authentication error. Use your ExaVault site's activity logs to determine the real reason for the failure.


# FTP and FTPS

FTP is popular for business-to-business integration, and the appliance supports it fully.

## Connection Information

The settings below cover the most common FTP connection issues. Double-check each of them.

### Hostname

Connect with either FTP or FTPS to the fully qualified domain name of your appliance. If your client requires an IP address, connect using the external IP address configured in the appliance manager.

### Port

For unencrypted FTP, use the default FTP port `21`.

For FTPS, use implicit FTP mode in your client and port `990`.

## Suggested Client Settings

The settings below give the best file transfer performance and mitigate transient errors without manual intervention:

* **Timeout:** 300 seconds
* **Retries**: 5
* **Delay:** 90 seconds

The delay allows failover to occur when an individual server host stops responding. The system detects these issues, spins up a new host, and directs new requests to it.

Failover will not work correctly when a hard-coded IP address is used instead of a domain name.

Most FTP clients expose these settings, and command-line automations can be scripted to loop and wait. In FileZilla the settings live under **FileZilla > Settings > Connection** as shown below.

<figure><img src="https://files.helpdocs.io/5csijzyv3k/articles/g6wae1e2do/1671739093989/file-zilla-timeout-settings.png" alt="FTP Client Timeout Settings in FileZilla"><figcaption></figcaption></figure>

* **Active vs. Passive mode:** Passive mode

Passive mode sends each file through its own channel and is more performant when sending multiple files.

<figure><img src="https://files.helpdocs.io/5csijzyv3k/articles/g6wae1e2do/1671740426887/filezilla-passive.png" alt="FTP Client Passive Mode Settings in FileZilla"><figcaption></figcaption></figure>

* **Keep-alives** are not needed unless your FTP client is aborting file transfers due to the control channel being closed when idle. Most FTP clients do not need this.
* **Simultaneous transfers:** 10

Each user is permitted to upload and/or download up to 10 files at the same time. It is also the maximum supported by FileZilla. Transfers beyond 10 are placed into a first-in, first-out queue on the client side.

<figure><img src="https://files.helpdocs.io/5csijzyv3k/articles/g6wae1e2do/1671744667232/filezilla-concurrent-transfers.png" alt="FTP Client Concurrent Transfers Setting in FileZilla"><figcaption></figcaption></figure>

If you are experiencing intermittent transfer errors, reducing this value may help.

* **ASCII vs. Binary mode:** Binary mode

<figure><img src="https://files.helpdocs.io/5csijzyv3k/articles/g6wae1e2do/1671744834268/filezilla-ftp-binary-mode.png" alt="FTP Binary Mode Setting in FileZilla"><figcaption></figcaption></figure>

No matter the file extension or mime-type, all files are stored exactly as they are when uploaded, byte for byte. You can compare the MD5 checksum on both sides to verify that no corruption of data has taken place.

Systems that depend on ASCII mode support are not compatible.

* **Logging:** Enabled with timestamps

This is to aid in troubleshooting and with filing a [support ticket](https://help.filesharing.guru/faq/contact-technical-support).

<figure><img src="https://files.helpdocs.io/5csijzyv3k/articles/g6wae1e2do/1671745514204/filezilla-log-settings.png" alt="FTP Client Log Settings in FileZilla"><figcaption></figcaption></figure>


# Troubleshooting FTP

FTP connection issues are almost always caused by firewalls or by incorrect settings in the FTP client. Work through the checks below before opening a support ticket. In our experience, the change that caused the problem is on the customer's side, and the steps here resolve the great majority of FTP issues.

## Check for Firewall Issues <a href="#check-for-local-network-firewall-issues" id="check-for-local-network-firewall-issues"></a>

Most FTP support cases trace back to the customer's or counterparty's corporate or network firewall. FTP is a frequently restricted protocol, and firewall changes can introduce problems where none existed before. FTP also has two modes, Active and Passive, which interact with firewalls differently.

### IP Whitelisting

If your firewall whitelists IP addresses, confirm that every IP used by your appliance is on the list.

If your firewall administrator requires an explicit whitelist for FTP traffic, request that they allow FTP ports `21` and `990`, plus data ports `40000-49999`, to all IP addresses used by your appliance.

### Active vs. Passive Mode

Many FTP clients let you choose between Active mode and Passive mode. ExaVault supports both, but a corporate or network firewall may block one or the other. Test both modes alongside the alternate ports above.

## Connection Settings in Your FTP Client <a href="#connection-settings-in-your-sftp-app" id="connection-settings-in-your-sftp-app"></a>

The settings below cover the most common client-side causes of FTP failure.

### Hostname

Connect with FTP or FTPS to the fully qualified domain name of your appliance. Do not include `https://` at the start of the address. When your client requires an IP address, use the external IP address configured in the appliance manager.

### Port

The default FTP port of `21` is blocked or interfered with by many corporate firewalls. Some FTP clients use "implicit security mode," which runs on port `990`.

### Timeout

When your client supports it, set the connection timeout to 60 seconds.

### Retry Logic

When your client supports it, configure three connection retries at 10-second intervals. Retries allow a failed connection to one server to succeed on a different server.

### Keepalives

ExaVault times out FTP sessions that have been idle for 120 seconds, to prevent unused sessions from holding server resources. Most FTP clients handle these idle timeouts without issue, completing transfers in progress and reconnecting on the next command. Some clients abort the transfer or error out on the idle timeout. When that happens, enable the client's keepalive setting (null packets or dummy commands) at an interval of 100 seconds.

## How Active and Passive FTP Work

FTP uses multiple network ports to move data between client and server. One port is the Command channel; one or more ports are Data channels. The Command channel carries the FTP session controls and directory listings; the Data channels carry file contents during upload and download.

The Command channel uses a well-known port — `21` or `990` — that firewall administrators know how to open. The Data channels use random ports and are established outbound or inbound depending on the FTP mode.

Most FTP connectivity issues are caused by firewalls that allow the Command channel but block the Data channels. The symptom is that the client connects and lists directories successfully, but file transfers fail.

### Active Mode

Active mode is the original FTP mode. It predates firewalls and is considered deprecated. Use it only on a Local Area Network (LAN), never when a firewall sits between the client and the server.

In Active mode, the client opens the Command channel to the server. The port depends on the FTP variant:

* FTPS (implicit FTP over TLS): port `990`
* FTPeS (explicit FTP over TLS): port `21`
* Plain, insecure FTP: port `21`

The Command channel is always established from the client to the ExaVault FTP server.

Once authenticated, the FTP server connects back to the client to open the Data channels. The client sends the server an IP address and a range of random port numbers, and the server connects to those. Active Data channels are always established from the ExaVault server to the client on a port the client chose.

Transfer commands flow over the Command channel; file contents flow over the Data channels.

### Passive Mode

Passive (PASV) mode was designed for clients that cannot accept inbound connections, including clients behind firewalls or on a NAT subnet. Because firewalls and NATs are now standard, Passive mode is the recommended FTP mode.

In Passive mode, the client opens the Command channel to the server in the same way as Active mode. The port depends on the FTP variant:

* FTPS (implicit FTP over TLS): port `990`
* FTPeS (explicit FTP over TLS): port `21`
* Plain, insecure FTP: port `21`

The Command channel is always established from the client to the ExaVault FTP server.

Once authenticated, the FTP server tells the client the port range of its passive data ports. The client then opens Data channel connections to the server on random ports in that range. For ExaVault, every FTP variant uses the same Passive Data channel range:

* Passive (PASV) mode: port range `21000` to `21050`

Passive Data channels are always established from the client to the ExaVault FTP server.

Transfer commands flow over the Command channel; file contents flow over the Data channels.

### Recommendations

Do not use Active mode unless there is no firewall between the FTP client and ExaVault. Always use Passive mode for FTP and FTPS connections to ExaVault.

When the client can connect and traverse directories but cannot upload or download, the Data channel is being blocked. Allow connections to the ExaVault Passive (PASV) port range through your firewall.

FTP uses the `OPEN` command on the Command channel to create a file before filling it with data over the Data channel. Zero-byte files appearing on upload or download mean your firewall is blocking the Data channel. Allow connections to the ExaVault Passive (PASV) port range through your firewall.

ExaVault uses fully valid and chained SSL certificates for FTPS connections. You do not need to configure your FTP client to allow insecure or self-signed certificates. When your client sees an invalid, self-signed, or expired certificate connecting to ExaVault, verify your DNS settings to confirm you are connecting to the correct IP addresses for ExaVault.

## ExaVault Configuration to Check <a href="#configuration-on-filescom-that-may-be-relevant" id="configuration-on-filescom-that-may-be-relevant"></a>

When the checks above have not resolved the issue, confirm that the user is enabled and that the username and password are correct. In the appliance interface, enabled users show a green check and disabled users show a red X. Select a disabled user and toggle Enable/Disable to enable it.


# WebDAV

WebDAV is a standard protocol for accessing your ExaVault account from a desktop or other computer. ExaVault supports WebDAV in full.

## Connection Information <a href="#webdav-server-details" id="webdav-server-details"></a>

The WebDAV URL for your site is the `https://` URL to your ExaVault domain followed by `/webdav`. Use `https://www.DOMAIN.com/webdav` anywhere a URL is requested.

WebDAV is offered over `https://` only. An unencrypted version is not offered.

## WebDAV Server Details

ExaVault operates a proprietary WebDAV server built and maintained in-house. The server is compatible with the WebDAV standards, and we regularly verify compliance using [Litmus](http://www.webdav.org/neon/litmus/), the official testing tool from the WebDAV organization.

## Windows Setup Tutorial

1. Open **Windows File Explorer** from the **Start** menu on your computer desktop.
2. Navigate to **Computer/This PC**.
3. Click **Map network drive** in the top menu.<br>

   <figure><img src="https://files.helpdocs.io/5csijzyv3k/articles/rwzpeu0rt5/1596577807561/webdav-win-10-map-network-drive.png" alt=""><figcaption></figcaption></figure>
4. Select any **Drive** letter by clicking the drop down menu.
5. Type **<https://YourCompanySiteAddress.com/webdav>** into the **Folder** text box. Replace "YourCompanySiteAddress.com" with your ExaVault domain.
6. Check the checkbox next to **Reconnect at sign-in** to connect each time you log on to your computer. *(Recommended)*
7. Check the checkbox next to **Connect using different credentials** to allow different users to log in each time.
8. Click the **Finish** button.<br>

   <div align="left"><figure><img src="https://files.helpdocs.io/5csijzyv3k/articles/rwzpeu0rt5/1532096960242/web-dav.png" alt=""><figcaption></figcaption></figure></div>
9. Connect using your account **Username** and **Password**.<br>

   <div align="left"><figure><img src="https://files.helpdocs.io/5csijzyv3k/articles/rwzpeu0rt5/1532097280433/web-davlogi.png" alt=""><figcaption></figcaption></figure></div>
10. Click **OK**.

A new window opens showing your files and folders. The network drive appears under **Network locations**. To create a desktop shortcut, right-click the drive and select **Send to...** then **Desktop**.

## Mac Setup Tutorial

1. Open **Finder** from the **Dock**.
2. Select **Connect to server...** from the **Go** menu at the top (⌘K)
3. Type **<https://YourCompanySiteAddress.com/webdav>** into the text box.
4. Then click the **Connect** button or simply press **Return**.

   ![](https://files.helpdocs.io/5csijzyv3k/articles/rwzpeu0rt5/1596577412980/webdav-macos.png)

   A new tab opens showing your files and folders. The network drive appears under **Locations**.

## Linux (GNOME) Setup Tutorial

1. Open **Files/Nautilus** from the **Dock**.
2. Select **Connect to server...** from the **Places** menu at the top.
3. Select **HTTPS (WebDAV)** from the **Type** drop-down box.
4. Type **davs\://YourCompanySiteAddress.com/webdav** into the **Location** field.
5. Then click the **Connect** button or simply press **Enter**.<br>

   <figure><img src="https://files.helpdocs.io/5csijzyv3k/articles/rwzpeu0rt5/1596577481724/webdav-ubuntu.png" alt=""><figcaption></figcaption></figure>

## Linux (KDE) Tutorial

1. Open **Dolphin/Konqueror** from the **Dock**.
2. Select **Connect to server...** from the **Places** menu at the top.
3. Type **webdavs\://YourCompanySiteAddress.com/webdav** into the **Location** field.
4. Then click the **Connect** button or simply press **Enter**.


# Administration Tasks

Administration tasks cover the work of optimizing and administering your ExaVault appliance. Our Support team may refer you to the pages here, and you can reach out to Support any time you need help with one of them.


# Restarting the Appliance

A hard reboot (for example, a "hard restart" in VMware) can leave services unable to restart correctly. Use the graceful procedure below so the appliance shuts down cleanly and your data stays consistent across reboots.

Connect to the appliance over SSH on port 10022, or through the virtual console provided by your VM environment.

To connect over SSH, open a Terminal or Command Prompt and run:

```
ssh user_name@domain_name:10022
```

For Virtual Console access, refer to the documentation for your virtual environment.

Log in. If you do not know the username and password, [contact Support](mailto:support@smartfile.com). Then run:

```
sudo exavaultctl -o restart
```

The restart can take up to 10 minutes.


# Logging

When troubleshooting the appliance you will likely need to reference logs. These are found in the following folder:

* `/data/exavault/logs/`

Customers on versions prior to v18.x may see logs in one of these folders as well:

* `/data/smartfile/logs/`
* `/data/veristack/logs/`


# License Keys

Every ExaVault installation, free or paid, registers and regularly updates a license key file. The license key tells the appliance which paid features have been provisioned, and a valid license key file is required for both free and paid usage.

In previous versions of ExaVault, system administrators uploaded and updated the license key file manually through the appliance manager application.

Starting with version 18, this process is fully automated. The ExaVault appliance makes an outbound request to our server-side API on a regular basis to retrieve and update your license key. You will not experience downtime due to a missing or expired license key after renewal.

If your paid account goes past due, the appliance automatically reactivates within an hour after the payment is received.

## Firewall Requirements

The license key update mechanism requires unrestricted outbound access on port 443 (HTTPS). This is a mandatory requirement for using ExaVault.

ExaVault does not support any deployment scenario where outbound requests to our API are blocked, regardless of free vs. paid status.

## IP Address Registration and Restrictions

To prevent abuse of our licensing system, each ExaVault installation must be associated with a single IP address at any given time.

Do not proxy outbound traffic through systems that could generate multiple source IP addresses. If you use a proxy, it must not alter the source IP address of license key requests.

### IP Address Changes

We allow legitimate IP address changes and process them automatically. To distinguish between real changes and license sharing attempts, only one IP address change per week is allowed. More than one change in a week is flagged as a potential license violation.

We are not aware of any legitimate need for an appliance to change IP addresses more frequently than once per week. If your setup requires this, contact our support team.

### Cloud Provider Considerations

When deploying ExaVault on a cloud provider, configure the appliance with a static (elastic) IP address. This prevents IP changes caused by instance resizes, stops, and restarts.


# Installing or Updating SSL Certificate

A new ExaVault installation includes a self-signed certificate. Most client programs do not trust self-signed certificates, and you will likely encounter warnings or errors, depending on the program.

We recommend replacing the default certificate with your own SSL certificate.

## Automatic SSL Certificate Management

A [Premium](/premium-features) plan unlocks [automatic SSL certificate management](/premium-features#automatic-ssl-certificate-management).

## Installing Your Own Certificate

You manage and update your site's SSL Certificate with the ExaVault Appliance Manager.

The SSL Certificate you provide must be in PEM format as a single file without a password. That file needs to contain all of the following components, in order:

* Certificate
* Intermediate/Certificate Authority Certificate(s)
* Private Key

### Creating A Combined PEM File on Mac/Linux

In Terminal, generate a single PEM file containing all three components of the SSL certificate with the following command:

`cat [certificate file] [bundle file] [private key/PEM file] > [combined_certificate.pem]`

### Creating a Combined PEM File on Windows

On Windows, create a new file in Notepad and save it with a .pem extension.

Copy the contents of each file into the Notepad file in the following order:

* Certificate
* Intermediate/Certificate Authority Certificate(s)
* Private Key

### Installation

Install the SSL Certificate from the ExaVault Appliance Manager at https\:// \[APPLIANCE\_IP-OR-HOSTNAME]:9002.

After logging in, open *HTTP SSL*. Under *Domain Cert*, select *Choose File* to upload the PEM file, then select *Add Domain Cert*.

Modifying the SSL Certificate requires a [restart of the appliance](https://docs.smartfile.com/filehub-on-premise/restarting-the-appliance).

## SAN Certificates & Changing Domain Names

ExaVault does not support multiple domain names with Subject Alternative Name (SAN) SSL certificates. You can upload a SAN certificate, but the web interface is only compatible with a single domain and will not function correctly when multiple domains are specified.

### Planning for Domain Changes

Take these steps to minimize the disruption of changing your installation's domain name.

Pick the switchover date. Plan the switch for a time with the lowest traffic, likely over a weekend.

Communicate with all of your users in advance. Inform them of the upcoming change, give them the new URL, and update any relevant bookmarks or login credentials. Some users may require notification through more than one channel.

Configure the new domain's DNS settings so the new records point to your ExaVault instance. Allow plenty of time for DNS propagation — 24 hours is a safe window.

Generate a new SSL certificate for the new domain and confirm it is properly validated.

Update the configuration in the ExaVault Appliance Manager at https\:// \[APPLIANCE\_IP-OR-HOSTNAME]:9002. Change the domain name on the configuration page, install the new certificate, and restart the appliance.

After restarting, confirm that the appliance is reachable at the new domain name.

Follow up with your users again to confirm the change is in place. Watch user access logs and feedback for any issues.


# Increasing Available Storage

You can increase the total available storage on your ExaVault appliance when it runs low.

This is a multi-step process. First, you will increase the size of the data disk in your VM's hypervisor. Then, you will log in to your appliance via SSH to expand the size of your virtual disk.

## Physically adding storage to your VM environment

First, make additional storage space available to your appliance using your VM environment.

This may be done by physically adding disks or provisioning existing storage so that it is available to your ExaVault virtual machine.

The exact instructions for this step will vary from environment to environment depending on server type, OS, and virtual machine environment.

## Increasing the size of your data disk

Once you have made additional storage space available, log in to your Virtual Machine Hypervisor with administrator rights and increase the size of your ExaVault VM's data disk.

Refer to your hypervisor's documentation for steps on how to do this correctly.

## Expanding the VM's virtual disk

Perform this step on your ExaVault VM's command line. Connect to the appliance via SSH.

Switch to the superuser account with the command `sudo su -`.

Check the filesystem type of your `/dev/sdb1` partition with the command `df -Th`. The filesystem type must be xfs. If `/dev/sdb1` shows any other type, contact Support for next steps.

Run the four following commands to unset existing partition information and grow the `/dev/sdb1` partition to use the newly added space:

```
ls /sys/class/scsi_device/*/device/rescan | while read path; do echo 1 > $path; done
ls /sys/class/scsi_host/host*/scan | while read path; do echo "- - -" > $path; done
growpart /dev/sdb 1
xfs_growfs -d /dev/sdb1
```


# Deleting Old Activity

In ExaVault, history logs (activity logs) are stored in Elasticsearch and made searchable in the UI. Customers with large Elasticsearch datasets can purge older activity log data to improve performance.

If you want to preserve the old log data, make a backup of your VM before continuing.

To interact with Elasticsearch, first connect to your appliance via SSH. Once connected, open a shell inside the Elasticsearch container:

```
sudo docker exec -it exavault_elasticsearch_1 bash
```

## Viewing Indexes

List the indexes containing daily activity logs by sending a curl command to Elasticsearch:

```
curl -X GET "localhost:9200/_cat/indices/audit-*?v=true&s=index&pretty"
```

This lists the daily audit indexes. All audit indexes are named using the format `audit-YEAR`.

## Deleting Indexes

To delete an index, send an HTTP DELETE command to Elasticsearch with the name of the index:

```
curl -X DELETE "localhost:9200/audit-1990?pretty"
```

To delete more than one year, comma-separate the indexes. This deletes indexes 1990 and 1991:

```
curl -X DELETE "localhost:9200/audit-1990,audit-1991?pretty"
```


# Deleting Old Quotas

Some legacy ExaVault installations hit a limitation that prevents creating additional users. The error returned is *User Quota Exceeded*, which blocks any new users from being created on the platform.

This quota is removed with a single command, given console or shell access to the server.

Connect to the server over shell or console access, sudo into root, and run:

```
docker exec -it exavault-mariadb-1 mysql -u smartfile --password=smartfile smartfile -e "delete from ftp_sitequotalimit"
```

After the command runs, refreshing the **Users** page on the ExaVault site lets the administrator create additional users.


# Appliance Manager Password Reset

The Appliance Manager is accessed at https\://\<your-appliance-ip-or-hostname>:9002/

If you have forgotten your password, reset it using the **Forgot Password?** link on the login page.

Resetting the password requires the Device ID, a UUID stored on the server at `/data/exavault/secrets/device.key`.

To retrieve this value, log in via your VM console or via SSH and run:

```
cat /data/exavault/secrets/device.key
```

Once you have the UUID, use the **Forgot Password?** link on the login page. When prompted for the device's ID, paste the value and submit it.

This process is also the only way to change the Appliance Manager password. Use the same process for password changes, even when you know the current password.


# Sending Email

Your ExaVault appliance generates a variety of emails, such as notifications of new user accounts, password reset links, invitations to download or upload shared files, and notifications of file and user activity.

## SMTP Configuration

ExaVault does not include its own email sending service, so you must provide your own SMTP service's information in your appliance manager configuration. Your mail provider will give you the information needed for sending mails via SMTP.

The appliance manager is located at the address for your appliance on port 9002. If your domain is `files.example.com`, the appliance manager is reachable at `https://files.example.com:9002/`.

Within the appliance manager, you must provide the following information on the Configuration page in order to send email:

* **Email Host**: The address of the server that will deliver email messages generated by your ExaVault appliance.
* **Email Port**: The port used for connecting to your mail service for sending.
* **Email SSL:** If your mail sender requires the use of SSL, check this box. Typically, this will be the case when using port 465 for your email port.
* **Email Username & Email Password:** The credentials used to authenticate with your mail service for sending.
* **Email From:** The from email address that will be used for emails generated by the ExaVault appliance.

Whenever you make a change to these configuration settings, you must save the changes and [restart your appliance](/administration-tasks/restarting-the-appliance) services.

## Troubleshooting Emails

Emails are generated by the ExaVault services within your appliance and then sent via your mail provider's SMTP service. Mails are delivered to your recipient's mail server, where they may be filtered, rejected or suppressed at the server level or the individual mailbox level. Troubleshooting what happened when an email is not delivered is often a case of checking each step in the chain.

The ExaVault appliance is made up of a number of services running in docker containers. The log files for all of these services are in the `/data/exavault/logs` directory on your server. Outbound emails generated by your appliance are sent asynchronously using the Celery service, which creates log files with names that begin with `celery`.

### Determine if Your Email Was Generated

Search the Celery log file in your log directory for email sending attempts; searching for `send_email` will help you find relevant lines. If there's an error contacting your mail service provider, such as an incorrect credential, you'll see a corresponding message in the logs about the failure. If you update your SMTP Configuration to fix this type of failure, you must [restart the appliance](/administration-tasks/restarting-the-appliance) after saving your configuration changes.

If the Celery logs only show that emails were sent and do not show any error messages, you have determined that the email was successfully created and was sent to your mail provider. Your next step is to check your mail provider's logs for the message delivery status.

### No Email Logs Generated

Search the Celery log file in your log directory for email sending attempts; searching for `send_email` will help you find relevant lines.

If no messages are added to the Celery log file when you try to generate an email, then the asynchronous workers are not processing jobs. This may mean that the queue service (RabbitMQ) or the worker service (Celery) have stopped responding. [Restarting the appliance](/administration-tasks/restarting-the-appliance) can resolve this problem.

### Check Delivery Status in Your Mail Provider

After you've determined that the ExaVault appliance was able to send an email using your mail provider's SMTP, you can check with your provider for any logs made available. The information available will vary, depending upon your provider.

You can usually determine whether the message that was sent using your mail provider was accepted by the recipient's mail server. If the recipient's mail server does not accept the email, this is known as a bounce, which can be a hard bounce or a soft bounce.

Soft bounces indicate temporary problems, such as the recipient's mailbox being full. A hard bounce happens when an email can't be delivered and never will be. A hard bounce usually means the email address doesn't exist, the domain name is incorrect, or the recipient's email server is blocking the message.

### Check Recipient Mail Filters

When you've determined that the recipient's mail server accepted your email and did not produce a bounce, the next logical place to check is the recipient's email filters. Emails from ExaVault may be wrongly identified as spam, particularly notifications of file activity, which often have repetitive subjects.


# Premium Features

Premium plans include additional capabilities that are not available on standard ExaVault installations. The sections below cover each premium feature in turn.

## Email and Phone Support

Premium plans include access to the ExaVault support team by email and by phone. The team answers questions and helps resolve problems with your ExaVault installation.

## Automatic Updates

Automatic Updating keeps your appliance current with the latest security patches, new features, and performance improvements. The feature applies to both the ExaVault software and the underlying Linux operating system, and is available exclusively on premium plans.

Automatic updates are managed through the built-in Appliance Manager. Administrators can enable or disable the feature, configure the time of day updates occur, and trigger updates on demand. The system checks for updates in real time and lets you apply them immediately or wait for the scheduled window.

When the feature is enabled, the schedule also covers OS-level maintenance through unattended upgrades, so the entire stack stays aligned and secure without manual intervention.

Customers not on a premium plan update by downloading a new image from ExaVault and manually re-mapping the data disk to the new instance.

### Enabling Automatic Updates

Log into the Appliance Manager to enable or disable automatic updates. The Configuration Page includes the settings:

* **Auto-Update** - When the box is checked, ExaVault will automatically check for new updates once per day, and will automatically apply new updates.
* **Time of Day & Timezone** - This is the hour of the day and the timezone used for ExaVault to check for updates. If *Auto-Update* is enabled, ExaVault will check every day during that hour. This lets you plan for updates and avoid disruptions.

The automatic update schedule also extends to OS-level maintenance through unattended upgrades, so your entire stack stays aligned and secure without manual intervention.

## Single Sign-On (SSO)

Premium customers can integrate ExaVault with a single sign-on (SSO) solution that supports SAML. Security Assertion Markup Language (SAML) is a standardized way to tell external applications and services that a user is who they say they are. Enabling SSO for authentication lets you incorporate ExaVault within your existing identity infrastructure.

If you also enable SCIM provisioning, ExaVault provisions user accounts automatically without manual setup.

## Automatic SSL Certificate Management

ExaVault Premium customers can enable automatic SSL certificate management on the Appliance Manager SSL Certificate page. This activates ongoing, automatic SSL registration and renewal for your domain.

Certificates are provided by [Let's Encrypt](https://letsencrypt.org/), a non-profit Certificate Authority that provides automated processes for managing and updating certificates. ExaVault is programmatically integrated with Let's Encrypt through the cloud service of our parent company Files.com, which removes human interaction from the certificate management process.

ExaVault monitors the expiration date of the SSL certificate and installs a new one automatically, so you don't have to monitor expiration dates.

### Enabling Automatic SSL Certificates

Automatic SSL Certificates are configured within the Appliance Manager.

On the Configuration Page, make sure the *Hostname* resolves to your appliance's IP address. If you update the configuration, restart the appliance from the Home Page.

Make sure that port 80 to your appliance's IP is not blocked by a firewall, so that the automatic process can verify connection.

If your *Hostname* is correct, visit the SSL Certificate Page, and change the option at the top of the page to *Automatic*. Nothing else is needed for automatic certificate updates.

When a new certificate is created, your appliance's proxy and SFTP/FTP services are restarted to automatically apply the updates.

## Two-Factor Authentication (2FA)

ExaVault Premium allows you to configure [Two-Factor Authentication](/using-exavault/users/two-factor-authentication-2fa) for your users.

To enable SMS (security codes sent as texts) for two-factor authentication, you must provide credentials for a [Twilio](https://www.twilio.com/en-us) account in the Appliance Manager.

## Syslog Export to SIEM

Automatic syslog export to your SIEM system is configured in the Appliance Manager.

On the Configuration page, enter the information for your SIEM system in the *Syslog Host* and *Syslog Port* fields. After you save your changes, restart the appliance from the Home page.


# Migrating to Files.com Cloud

Files.com offers a managed migration path from the ExaVault on-premise appliance to the Files.com cloud platform. We've run this migration for many on-premise customers and would like to include you.

The Files.com platform covers everything ExaVault does and adds many features the appliance doesn't have. Our website has a [comparison table](https://www.exavault.com/pricing) showing the differences between the two. The sections below summarize the main reasons customers move.

## Security and Compliance

Files.com supports SOC 2 Type II, HIPAA, GDPR, and other [compliance frameworks](https://www.files.com/docs/compliance/compliance-frameworks). Data is protected with [encryption](https://www.files.com/docs/encryption) in transit and at rest.

Security patching is handled by Files.com, so you no longer have to schedule, apply, or verify updates on an appliance.

Files.com also offers [regional data residency](https://www.files.com/docs/data-governance/regional-storage) across 7 global regions to meet specific compliance and regulatory requirements.

## Performance and Scalability

Files.com runs on a globally distributed cloud platform with edge locations for faster transfers worldwide.

Storage capacity is unlimited and expands on demand. There is no hardware to purchase or provision.

Infrastructure runs across multiple availability zones with an [uptime SLA](https://www.files.com/docs/billing-and-accounts/service-level-agreement) for customers on Premier and Enterprise Plans.

## File Sharing

Files.com adds sharing options that the appliance doesn't have: expiring links, automated email notifications, and granular permissions.

You can provide [secure upload locations](https://www.files.com/docs/sharing-and-collaboration/inboxes), publish assets [for public download](https://www.files.com/docs/sharing-and-collaboration/public-hosting-web-hosting), or create a [fully-interactive data room](https://www.files.com/docs/sharing-and-collaboration/virtual-data-room). You can also [co-author and collaborate](https://www.files.com/docs/sharing-and-collaboration/files-editor) on standard business files with Microsoft Office 365 or the Files.com Editor.

## Cloud and On-Premise Integrations

Files.com integrates directly with public and private cloud storage, including [Amazon S3](https://www.files.com/docs/integrations/remote-servers/cloud-storage/amazon-s3), [Azure Blob Storage](https://www.files.com/docs/integrations/remote-servers/cloud-storage/azure-blob-storage), [Azure Files](https://www.files.com/docs/integrations/remote-servers/cloud-storage/azure-files), [Google Cloud Storage](https://www.files.com/docs/integrations/remote-servers/cloud-storage/google-cloud-storage-gcs), and other [cloud storage providers](https://www.files.com/docs/integrations/remote-servers/cloud-storage).

You can also integrate with sync-and-share providers like [Box](https://www.files.com/docs/integrations/remote-servers/content-collaboration-ccp-enterprise-file-sync-and-share-efss/box), [Dropbox](https://www.files.com/docs/integrations/remote-servers/content-collaboration-ccp-enterprise-file-sync-and-share-efss/dropbox), [SharePoint](https://www.files.com/docs/integrations/remote-servers/content-collaboration-ccp-enterprise-file-sync-and-share-efss/sharepoint), and [more](https://www.files.com/docs/integrations/remote-servers/content-collaboration-ccp-enterprise-file-sync-and-share-efss). The Files.com [On-Premise Agent](https://www.files.com/docs/on-premise/agent) connects legacy on-premise systems and private cloud storage.

## Applications

Files.com includes a [web interface](https://www.files.com/docs/client-apps/web-interface-web-ui) for administrators and a [file manager](https://www.files.com/docs/files-and-folders/file-manager) for end users.

The [desktop application](https://www.files.com/docs/client-apps/desktop-v6-app) provides fast file transfers and drive mapping, so you can work with cloud files as if they were on your local system.

The [iOS and Android applications](https://www.files.com/docs/client-apps/mobile-app) cover file access, sharing, and management on mobile.

The [CLI application](https://www.files.com/docs/client-apps/command-line-interface-cli-app) handles site management from the command line and is built for scripting and automation.

## Workflows and Automation

Files.com supports automation rules that replace manual file-handling work. You can deliver files to partner SFTP servers through [Remote Server Mounts](https://www.files.com/docs/integrations/remote-servers/remote-server-mount) without installing anything on the remote side.

[Remote Server Syncs](https://www.files.com/docs/integrations/remote-servers/remote-server-sync) move content between connected services on a schedule, replacing batch scripts that IT teams otherwise maintain. Files.com [Automations](https://www.files.com/docs/automations) perform file management tasks and integrate with external APIs.

[Webhooks](https://www.files.com/docs/notifications/webhooks) notify other services of important events so you can trigger downstream processes in real time. All automated activity is [logged and traceable](https://www.files.com/docs/logging).

## Developer Tools

Files.com provides maintained [SDKs](https://www.files.com/docs/sdk-and-apis) in PHP, Python, Java, JavaScript, Go, Ruby, and .NET. They are backed by [developer documentation](https://developers.files.com/) with tutorials, code examples, and implementation patterns.

The Files.com MCP (Model Context Protocol) server provides [direct integration with AI tools](https://www.files.com/docs/integrations/ai/model-context-protocol-mcp-server) for automated file processing, content analysis, and AI-driven workflow automation.

## Migrate to Files.com

If you are on an Enterprise Agreement with ExaVault (an annual contract of $7,500 or more), the transition and migration is 100% free of charge and included in your existing ExaVault contract. We will also provide free cloud hosting at any volume for the duration of your current contract.

If you are on a free or lower-priced plan with ExaVault, we'd still like you to switch to Files.com for cloud-based service. Give us a call and we'll quote service for you.

Call us at 1-800-286-8372, extension 5, or write to <support@files.com> to start a cloud migration.


# Migration Process Overview

To begin your migration, first complete the [**Technical Enablement Steps**](/migrating-to-files.com-cloud/technical-enablement-steps). This includes enabling a setting in the Appliance Manager and opening specific firewall ports.

Once those steps are done, contact Files.com Support. They will initiate a **pre-migration**. This is a dry run where all of your files, users, and settings are copied to a brand-new Files.com cloud site. Depending on your data size, this process may take some time. When it's complete, you'll receive access credentials and a cloud URL from our support team.

## Reviewing the Pre-Migration Site

Review the pre-migration site to confirm everything looks correct. Configure any required SSL certificates, and optionally customize your SFTP host key, MOTDs, and other site-specific settings. We make a best effort to migrate branding elements, but review those manually.

Important best practices during pre-migration:

* Avoid making changes to the pre-migration site. To explore features or test configurations, create a new folder at the root level and work only within that folder. Do not connect this folder to your production site.
* Do not add users to the pre-migration site. Any users you add will be ignored during final migration.
* You may review existing users, but do not edit or delete them until after the final migration.
* Make any changes to existing users or site settings on your production site. Those changes will be applied during the final migration.
* Site settings may be overwritten during the final migration, so plan to review them again afterward.

To make sure your custom domain works correctly after the migration, configure your SSL certificate on the new site. You can upload it yourself under Encryption > SSL Certificates, or send it to us and we'll handle the installation for you.

## Performing the Final Migration

When you're ready to proceed, coordinate with Files.com Support for the final migration. They'll do a final sync of your settings and files and update the pre-migrated site with all of your latest data.

Once that sync is complete, they'll let you know, and you'll be ready to update your DNS to point to the new cloud environment.

At that point, shut down your on-premise appliance.

Welcome to the cloud!


# Technical Enablement Steps

When migrating from ExaVault to the Files.com Cloud, our Support team is available for hands-on assistance throughout the process.

## Enable Migration in Appliance Manager

In Appliance Manager, enable the **Enable Migration to Files.com** setting. This authorizes the Files.com service to connect to your appliance and transfer your configuration and files securely.

Access is strictly limited to the **Files.com published IP range**, so only Files.com can connect to your appliance during the migration. No other vendors or outside parties can connect.

**Important:** Only enable this setting during your active migration window.

## Firewall Requirements

If your appliance is protected by a firewall or hosted within a cloud provider, configure the following network access for the migration.

**Ports to open:** `16043`, `16306`

**Source IP Range:** `198.72.80.0/20`\
(This includes all IP addresses from `198.72.80.0` through `198.72.95.255`.)

This opens inbound traffic from Files.com to your appliance. Port 16306 is used for Files.com to connect to the appliance's database to transfer the database content, and port 16043 is used for Files.com to download the contents of your file storage.

**Security Reminder:** Do not open this IP range outside of an active migration to the Files.com Cloud.


# Regional Considerations

Files.com offers cloud hosting in 7 service regions. During your migration, files will be migrated to our USA region.

Once the migration is complete, you will then be able to move the files to any other region with one click, using Files.com's standard interface for changing regions.


# HyperPrivacy Mode

ExaVault used to offer a site-wide configuration option called HyperPrivacy Mode that, once set, cannot be changed without completely rebuilding your entire site.

This capability requires an Enterprise license and is no longer offered for new accounts.

**This legacy documentation is only applicable to the few customers who still use HyperPrivacy Mode.**

## Differences Between HyperPrivacy Mode and Normal ExaVault

In a normal ExaVault installation, there is one root file system, and Users are provisioned access to that file system using Permissions. Permissions can be granted on any folder.

In HyperPrivacy Mode, each user gets their own file system, completely to themselves. The only way for one user to access the files of another user is for that user to share those files or folders explicitly.

This creates an extremely private environment for each user. Files owned by a user cannot be seen by site administrators.

## History of HyperPrivacy Mode

This setting was formerly called "NextGen", "DatabaseFs", and "Contemporary platform" at various times and in various places.

For a period of time, HyperPrivacy Mode was enabled by default when installing ExaVault.

Due to challenges associated with administering sites which use HyperPrivacy Mode, we no longer recommend that customers enable HyperPrivacy Mode.

## Determining HyperPrivacy Mode Status

If you have a left menu for both "Files" and "Shares", your ExaVault site has HyperPrivacy Mode enabled.


# User Home Folders

When your site is using HyperPrivacy Mode, you can choose whether a user has a home folder. Home folders are a private space accessible only to that user by default.

## Users With Home Folders

Administrators can only access their own home folder; they cannot see or access any other user's home folder. The location of each home folder is automatically assigned and managed by the system when the user is configured to have a home folder.

Users have full access to their own home folder, and can upload, download, delete, and list contents.

## Users Without Home Folders

Users can be configured to not have a home folder. When a user does not have a home folder, any folders they interact with need to be shared with the user by other users.


# User Deletions

In HyperPrivacy Mode, each user gets their own file system. Files owned by a user cannot be seen by site administrators. The only way for one user to access the files of another user is for that user to share those files or folders explicitly.

When you delete a user in HyperPrivacy Mode, all of that user's files are also deleted. These files cannot be restored from the Trash.

If a site administrator needs access to a departed user's files, capture them before deleting the user by signing in to the site as the user. A site administrator does this by modifying the user's authentication credentials.


# Sharing

Sites using HyperPrivacy mode include the Sharing feature for sharing files and folders between different users. Use it whenever you need different users to access the same files: a Marketing team and a Sales team that both need to download the same data, individuals collaborating on a confidential project, or employees onboarding and off-boarding external partners for automated data flows without administrator involvement.

## Use Case: Inter-Departmental Sharing

In this example, groups represent distinct organizational units: a Sales group, a Marketing group, and a Product group. Users are assigned to only one of those groups, depending on which department they work for.

If all the users in this example are assigned the default User role provided with a new installation, they will all have the ability to share folders. A member of the Product group might create a folder that contains demonstration videos and case studies, and then share it with the Marketing and Sales groups. Each user in those groups can download items from that folder.

## Use Case: Intra-Departmental Sharing

In this example, a group of users represents a single department. The manager of this department needs a private area for confidential items the employees cannot see, while all work files generated by the department are shared among the employees and accessible by the manager.

The manager is configured with a role that allows them to manage other users and to create shares (the default Manager role works for this), and the manager is granted a home folder for private files. The employees are not granted home folders. The manager creates a separate folder in their own home folder, and then shares that with the employees in their department.

The result: the manager has access to all of their employees' work product along with the manager's own confidential folders, but employees see only items in the shared area.

## Use Case: Delegated Administration

In this example, an employee is responsible for managing file exchanges with a set of partners. The partners need to upload files daily and need access to download from a shared folder.

First, configure a role (or use the default Manager role) that provides the sharing capability and the ability to manage other users, and assign that role to the employee. Create a second external user role that does not include the sharing capability or any management of any users. Create a user group that represents the partners.

When the manager employee creates user accounts for each partner, they assign each new user that external user role, disable the home folder, and add them to the user group for partners.

Next, the manager creates a folder for each partner in the manager's home folder. The manager shares each folder with the appropriate external user, granting them the ability to make changes in the folder.

For the shared download folder, the manager shares the same folder with the partners group, without granting them the ability to make changes. This provides read-only access to the shared download folder for all the partners.

## Required Role Capability

Users whose roles include the *Allow sharing files or folders with internal users and creating public links for external users* capability can share items with other users and groups. The default User role includes this capability by default.

Users with a [home folder](/hyperprivacy-mode/user-home-folders) who have a role that allows sharing can share any item in their home folder with any other user or group. This means the capability to share items also allows a user to list all of the users and groups in your installation.

If you create user accounts for external contacts, you may want to create a customized role for those users that does not include the ability to share, so that they cannot see all of the other users in your installation.

## Accessing Shares Via FTP

For a user with a home folder who connects with FTP/SFTP, all items shared with the user are listed under a folder named *shares* in the root folder.

Users who do not have a home folder see a list of any shared items in the root folder when they connect over FTP or SFTP.

## Permissions for Shares

Each shared item has four permissions for a user or group: read, write, share, and link. Permissions for a shared folder are fully recursive and apply to all the files and folders in that share.

When you share an item with other users or groups, they always have the read permission, which gives them the ability to download from that share and to enter any subfolders within a shared folder. Users with read access to a shared folder can also upload folders into that folder via FTP or SFTP, and they have full access to those uploaded items.

Granting the write permission (displayed as *Manage*) to a user for a share allows them to upload, create new folders, rename items, delete items, and use the move or copy features with the share. Users with write permission to a shared folder can delete every item within the folder, but cannot remove the folder itself. Users with write permission to a shared item can rename the shared item.

The share permission allows users to share the item with other users and un-share it from any users, including their own account. If the user with share permission also has other permissions, they can grant or remove those permissions for others when sharing the item.

The link permission allows users to create external public links for the item. Users cannot grant higher access than they have to the item shared with them. If the user does not have the write permission for the share, they cannot create links that allow uploads.

### Group Permissions vs User Permissions

The permissions assigned to an individual for a share take precedence over permissions assigned to any group the user belongs to.

When a user is a member of multiple groups with different permissions for a share, the user receives the combination of all granted permissions.


# Retention Rules

Retention Rules are a special type of Automation that is only available for sites using HyperPrivacy Mode.

Retention rules help enforce your company's document retention policy by removing items after a certain period of time. You can also enforce the uniqueness of items with a retention rule that deletes copied files automatically.

## Retention is a Path Based Rule

Retention rules apply to a single path, or to all of the paths accessible to the rule's creator. All users can make new retention rules, but each user's rules apply to paths in the user's home folder or paths which are shared with them. An administrator cannot create a rule that globally applies to all folders in other users' home folders.

### Site-Wide Retention Rule

You can emulate a retention rule for your entire site. Choose one administrator who will be the only user with a home folder. Set up all of your other users without a home folder. The administrator creates any needed folders in their own home folder, then shares each folder with the users or groups who need access.

All of the folders in the site belong to one administrator's home folder, so that administrator can create a global retention rule.

## Event-Based Triggers

Retention rules delete files from the affected paths when specific actions are taken in those folders by any user. This can be any combination of read operations (either downloading or opening a file) or copying a file.

A retention rule that triggers on file Reads removes files whenever they are opened or downloaded. One use is an automated exchange flow where each file is downloaded only once for processing. If you deliver files to a counterparty who uses an SFTP script to download all files in a folder shared with their user account, a retention rule means the counterparty does not have to keep the folder tidy or determine whether a file has already been downloaded.

When an event-based rule triggers when files are copied, the copy of the item is immediately deleted. This essentially disables the copy function for the affected folders. You might use this rule for version control, so that only a single version of a particular file exists.

## Time-Based Triggers

Retention rules can be set to remove files a certain number of days after they are uploaded, or a certain number of days after they were last modified. The system checks for files that meet these time-based triggers every 12 hours.

## Activity

File deletions caused by retention rules appear in the Activity listing. The IP address for the action is 0.0.0.0. When a user performed an action that triggered the deletion, that user is logged as performing the deletion.

## Notifications

When configuring a new retention rule, you can add a step for notifying users about the deletions. As with notification automations, this can be configured to send to a combination of users or groups, but only those users who have access to the path that is removed receive the email.

File deletions caused by retention rules trigger any matching notification automations for deletions. Users only receive emails for files deleted from paths they have access to.

When notifications are configured for a retention rule and as a stand-alone notification automation, users may receive more than one email for the same activity.


# Trash Can

The Trash feature lets users restore deleted files. It is available only to sites with HyperPrivacy Mode enabled. For most sites, deleted files can be restored within 30 days of deletion; some plans let you change the *Age of Files in Trash Bin* setting for your site.

## Who Can Restore

All users can access the Trash Can feature, but only files that you can restore will be listed.

### Files Deleted From Your Home Folder

If a file from your Home folder is automatically deleted by a retention rule, you will have access to restore it from the Trash Can.

If a file from your Home folder is manually deleted by a user, it can be restored only by the user who uploaded the file.

### Files Deleted From Your Shares

Files from your Shares folder that were automatically deleted by a retention rule must be restored by the owner of the folder that was shared with you.

Files from your Shares folder that were manually deleted by a user can be restored only by the user who uploaded the file. If you uploaded the file to your Shares, you will be able to restore it.

## Deleted Files in Deleted Users' Trash

Each deleted file appears in only one user's Trash Can. When a user has items in their Trash Can and the user is deleted, the files cannot be restored.

If an administrator needs to access items in a different user's trash, they must log in as that user. This probably means changing the user's password.

## Quota

Files in the Trash Bin count against your storage quota. Quotas are calculated twice per day, so removing items from the Trash Bin is not immediately reflected in your quota.